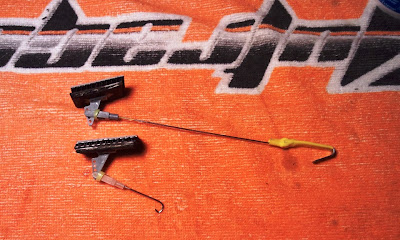
1 inch x 2 inch blocks cut and drilled to hold eyelets. These are the cable guide blocks.
My garage became the painting room. I painted both surfaces of the main board to protect the wood against moisture from the grass.
To make lines to show where the wires are, I placed 2 inch masking tape where the yellow lines will be. I then used masking tape to create the edges, then removed the 2 inch tape. I used the soft non-textured side of the foam mat. Its that 2x2 puzzle edge stuff for workshops or gyms.
Some extra masking and I was ready for spray paint. In the future I will use brush on paint and a roller. This took way too much time and too many coats to get it even.
The humidity got so high in the garage... I moved painted items to "the drying room".
I wanted to edge the yellow lines with black. I used a Magnum marker and a straight edge.
I would need a small block to lift the cables. I cut some scrap spar wood into 20mm pieces and used a glue stick to temporarily hold them on a piece of cardboard for painting.
Liberal coat of black paint from a rattle can. In 10 minutes they were dry and I plucked them easily off the board.
I cut the puzzle ends off the sides of the foam runway piece, leaving it on the ends to join to the runway. The black lift blocks are CA'd onto the foam. I installed the eyelets and then epoxied the blocks to the board. Originally I was going to have the eyelets facing up, but this lifted the cable higher than I wanted it, so I laid them on their sides (and used that Magnum marker to color the back), and came up with the lifting block idea to give me about 5-7 mm clearance.
For the larger arrestor hook, I took a picture hanger hook and broke off the nail end. I soldered it to a control rod using a torch.
I covered the hook and the soldered section with shrink wrap. The proximal end is a clevis attached to a backwards control horn, which is CA'd to a piece of scrap plywood also colored with that marker. To that i have attached a piece of 3M Dual Lock Velcro. This is attached to the plane. I also made a small one.
I don't have a small foamie so I put the arrestor hook on the camera Dual Lock on the bottom of my Eflite Alpha Sport 450. It will hang down... It may hang up on take-off from grass. I could rig a servo to release it, but I don't know that I plan to routinely land the Alpha with with arrestor hook.
The arrestor system in repose.
A soft spring (Home Depot) attached to a plastic wall hook secured to the board using VHB, with a thin bungie (Walmart craft section), running through the eyelet across the runway, and tied off on the other side. I alternated every other side for looks and to keep it from being crowded.
Can't wait to see if it will work!
Next up, the long runway!


Wow! That is seriously neatto.
ReplyDelete