Kenny and I tried videoing with his Sony Handycam, and it was difficult... We couldn't see the screen on the viewfinder and had to guess where the airplane was, and the autofocus had trouble staying focused, so much of the video was not usable. But here's what I edited up of Kenny working his Edge in a very brisk wind at BMF, basically Kenny shooting crosswind approaches while I'm harassing him.

Monday, October 31, 2011
Ultimate bits
A Handycam vid... only what we could use from the long DVD, since the autofocus, invisible viewfinder, wacky zoom and operator wedgie pretty much made most of it unwatchable! So, here are bits and pieces of me flying my Eflite Ultimate!
Sunday, October 30, 2011
Now THAT'S what I'm talkin' about!

My Eflite beauties! Pulse XT 25e on the left, Ultimate 20-300 10 on the right.

Three of my Eflite favorites (the Cornell was at home). All flew great today!

People had issues with the battery compartment. I don't think its a problem at all. The 3S 2200 mAh batteries all fit great and balance her fine. She is sturdy, took a hard landing fine. Can't wait to fly her again tomorrow!
Saturday, October 29, 2011
Dusting off my Helis!
Wow... I haven't flown a heli since I crashed the Erazor 450 back in July! Has it been that long? Today was a blustery day (winds to 20 mph, gusts much higher, but beautiful skies...) so I decided to work on the helis. I went through my dead helis. I ordered the Hitec HS 85MG servo for the HDX 500SE (parts are getting hard to find...) and some EXI D213f digital metal gear servos for my heli backups. Then I started the Erazor rebuild by taking her apart... I scavenged a D213f servo and a really good Hitec HS 5084MG tail servo from the dead 250 (I don't plan to rebuild her anytime soon). I will be installing an Align GP 780 gyro I recently purchased, to replace the Futaba 601. I am going all MEMS from here on out. She still has the Spektrum AR6100 receiver on her, and her ExceedRC Proton 40A ESC. I replaced the Erazor tail tube with an EXI one, but have ordered some Dynam Erazor tubes should I have to replace it again. The Erazor canopy is toast, the replacement way over priced, so I will be using a slightly longer Tacon 450 canopy.


This is how she has looked since the crash in July...

Stripped, rebuilt the tail and tail tube, installed a replacement main gear for the stripped one, rebuilt the rotor head and replaced the feathering and main shaft. Need to replace the bad elevator servo, re-install the ESC, re-install the rotor head, fine tune the tail and secure the boom, then setup the blades and CCPM.
I am pretty excited about getting back into my helis. I plan to spend a lot more time on the Phoenix sim, and this time I hope to see some strong progression in my skills. Hopefully I will fly the Erazor next week. I also purchased a BeastX Flybarless system for my 4 blade EXI 450. Next week I plan to work on it and on the HDX 500 SE. I am excited!
Thursday, October 27, 2011
The shiny came of Kenny's Edge
It was bound to happen. Kenny Chandler treated his Seagull edge like a princess. She was always pampered, and he would fly her only when he felt the mojo to make sure she got his best. His hands would shake after a close moment in a flight. It would take him sometime and a couple of cigarettes for his nerves to settle. This from a guy whom it takes a lot to shake. We have all been there.
And anyone who has flown has been here... Yesterday Kenny had a head-wedged moment, and took the shiny right off the Edge. On final he thought, for who knows what reason, that he was upside down, and rolled her over. He pulled back on the stick and planted her firmly in the trees. Yup, one of those, "what the hell was I thinking????" moments we have all had and wished we could get a do-over for.
Kenny sent me these before and after repair pics. Here's after the crash, before the repair.


And here's after the repair...


Kenny did what he could with what he had on hand as he wanted to get her flying again. Looks like he did a pretty good job! He thinks its ugly now (not shown is the canopy which apparently took a hit too), but he'll get the right cote and make it better soon. He took her ot this morning and she flew like nothing had ever happened, the proof in the flying!
Now that the shiny is off I think he will fly her even better, since he's no longer afraid of hurting her shiny!
Wednesday, October 26, 2011
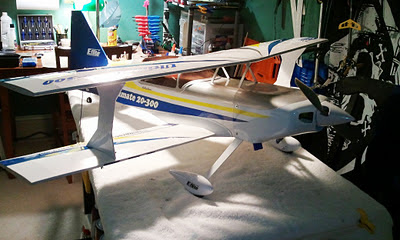
Eflite Ultimate Flight Ready
Yesterday I started work on my new Horizon Hobby Eflite Ultimate. Today I finished her. Really this airplane is an easy and straightforward build. Its rather delicate though. It's a 3D aerobatic plane, so is purposefully very light. Pressing a part into place with light pressure, such as a servo screw into a predrilled hole, is met with cracking sounds from the fuse. One blog post talked about being concerned about the screws used to secure the interplane struts and the possibility of putting a driver through it. They are small, and challenging to get into place and screwed tight. And yeah... a driver slipped and I poked a hole in the cote... The battery compartment isn't all that bad, but the tray wall is weak or at least the joints weren't glued well (it snapped off clean at the joints when I was putting a piece of Dual Lock on the other side for the ESC). I strengthened it with popsicle sticks and glued the joints with CA and all is well. The battery compartment is smallish at the entry, but plenty of space beyond. Setting the battery against its Dual Lock without breaking the tray is a bit challenging, but doable. All in all, a simple build, and she looks very good, but she is fragile!
She is equipped with an Eflite Power 10 electric motor controlled by an ExceedRC Proton 40A ESC. She has a Spektrum AR600 DSMX receiver. I am using EXI D213f digital metal gear servos all around, which I have had great luck with.


She is equipped with an Eflite Power 10 electric motor controlled by an ExceedRC Proton 40A ESC. She has a Spektrum AR600 DSMX receiver. I am using EXI D213f digital metal gear servos all around, which I have had great luck with.

Spektrum receiver in situ. Also note the sharp corners of the plastic wing fillets. These things snagged on everything and eventually one snapped off. Once I got the wing on I CA'd it back on.

I had to place the ESC opposite the battery on the same tray (the black velcro loop is for the battery).

Canopy glue on the canopy with painter's tape holding it in place. Quick easy fit.


Tuesday, October 25, 2011
Eflite Ultimate Build Day #1
My last plane for a long time... Building the Eflite Ultimate from Horizon Hobby is easy and very straightforward. Some have complained about weak control pieces, but I found them to be fairly strong nylon. Maybe Eflite changed them? The plane is much smaller than I expected, but looks good!


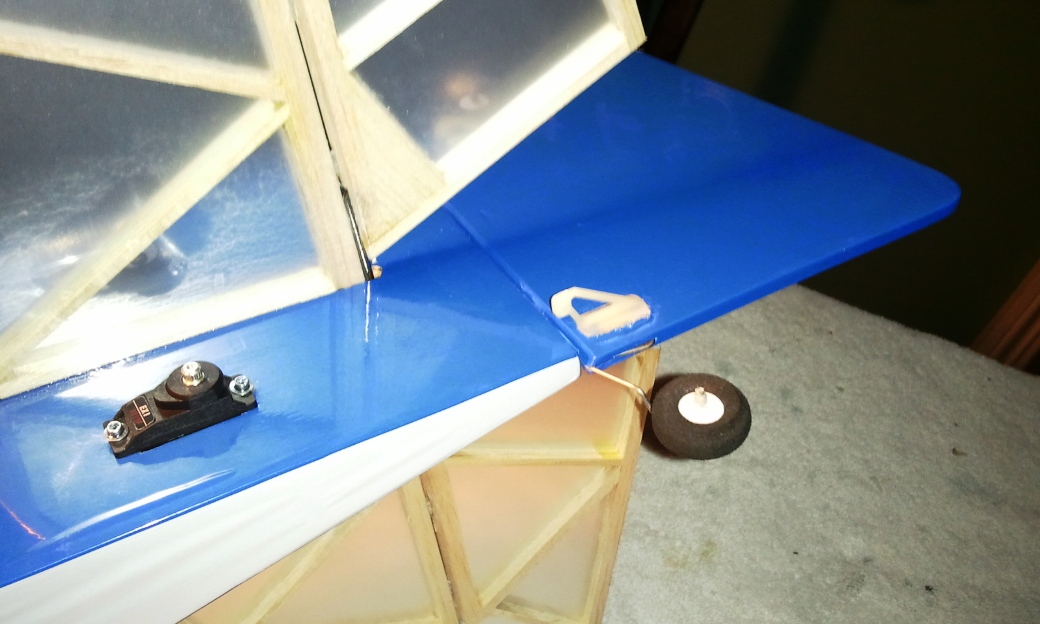
The wings came joined. I had to install the ailerons and the servos.

The servos are angled slightly to align with the air stream, I guess, but angled off. The control rod is straight with the aileron. This geometry results from the swept back wings.

Yes... Goof Off will remove the paint from the sticker... who knew?
I misread the photo and installed the rudder control horn on the wrong side. I had to pop it off, and reinstall it. Came off surprisingly easy despite the CA on this side and the back plate on the other.. Lucky me.

The rudder and elevator leads are dangled down through the fuse. easy as I could stick my hand all the way up through the fuse.
Tomorrow I plan to finish the tail, install the electronics and the motor. Should be able to finish her!
Sopwith on Station
I used a 50 lb hook (and a second failsafe) to hang the Sopwith. I had to move the Stearman as this is the biggest wall. The baby Sopwith looks good, but the cornell looks like its cowering. I made some adjustments to the motor, and set the CG, having to add 1-1/2 oz to the nose. This thing is heavy. Ran the battery and the motor, took almost 10 minutes to lose power. This was done in a couple steps as I found that the motor shaft securing C-pin thingy was not snug and the rotor lifted off the motor at full throttle. Fixed that, but had to remove the entire motor assembly to get at the C. I thought the motor sounded odd, now she sings sweet! LOTS of power using 2x 2S 4000 mAh 30C in series.


Sunday, October 23, 2011
Sopwith Joins the Piratey Squadron
I completed the Sopwith build today! She is ginormous and gorgeous!


Turns out the motor at full extension, mounted through the front of the motor mount so that the motor shaft accepted the collette, came up short. I would have to order a longer adapter collette, and use some spacers for the prop to clear. I hated that idea... so I gave it some thought and this is how I ended up having to engineer it. What dya' know, it worked perfectly! I reversed the motor and the motor mount, added some spacers, and installed the bolt-on prop adapter, so that the motor extends beyond the motor mount, which is the limiting factor getting the motor shaft to extend beyond the cowl. Problem solved.

This morning found that all the O-rings that act as shock absorbers in the landing gear had snapped. They were old and brittle, so I wasn't surprised. Replaced them with some I had for a prop saver.

Xoar wood electric prop installed. Sweet! How about that red band on the cowl, eh?

This was annoying, though given why this happened, I could accept the problem. In the early kits you had to make the stay wires yourself from supplied materials. Mine were all cut to length, and joined with their connectors. In the plans, the attachment to the fuse is where the two small holes are drilled aligned with the tail skid. Well, the pre-made wires don't allow that point, and had to be installed further towards the nose, where those second holes are. Came out very nice indeed!

Top view. Forgot to get the bottom view...

Laying out the main wing stay wires and attaching the wing.

Wow, simple to install the stay wires! I was quite pleased not to have to make each wire...

Close up of the mock motor and cowl.

I thought the stock pilot figure looked dead... I liked this tougher guy better!


Later when I do take her outside, I'll get some nice photos. All done, huge! Excited to fly her!
Subscribe to:
Posts
(
Atom
)