There was that day last week where I took up knitting. Part of the excitement was dropping the very fragile (now we know...) Twinstar, having the nose cone shatter and the wing crack in half, breaking the spar and the small thing that stuck out of the front securing it to the fuselage.
I put the wing back together, made a new notch thing, and after a couple of days I laid down two layers of fiberglass cloth using epoxy resin. Let that dry a few days and then today I sanded it smooth, covered it with white cote. Smooth as a baby's bottom.
Nice glass work! The middle 4 inches is fiberglass.
The nose cone arrived just as I finished the wing and reinstalled it onto the plane.
I didn't like the single needle as it broke in. It was touchy, and started becoming more difficult to keep tuned. She started to lag on throttling up from idle to full, and I couldn't tune it out. So, upgrade.
The single needle was a choke-less carb. The single needle was in the middle throttle body, and the control rod attached on the same side, you adjust it for high RPM, and hope the low end takes care of itself. This was on the underside of the engine when I originally installed it, and the throttle servo was set up on the top. My history with the Sukhoi and the RCGF-USA 10cc is here.
I had a plan for the re-install. It didn't go as planned, and I ended up having 2 main problems to overcome and improvised as I went along. I had to rearrange the throttle servo and its case, and re-design the throttle control arm.
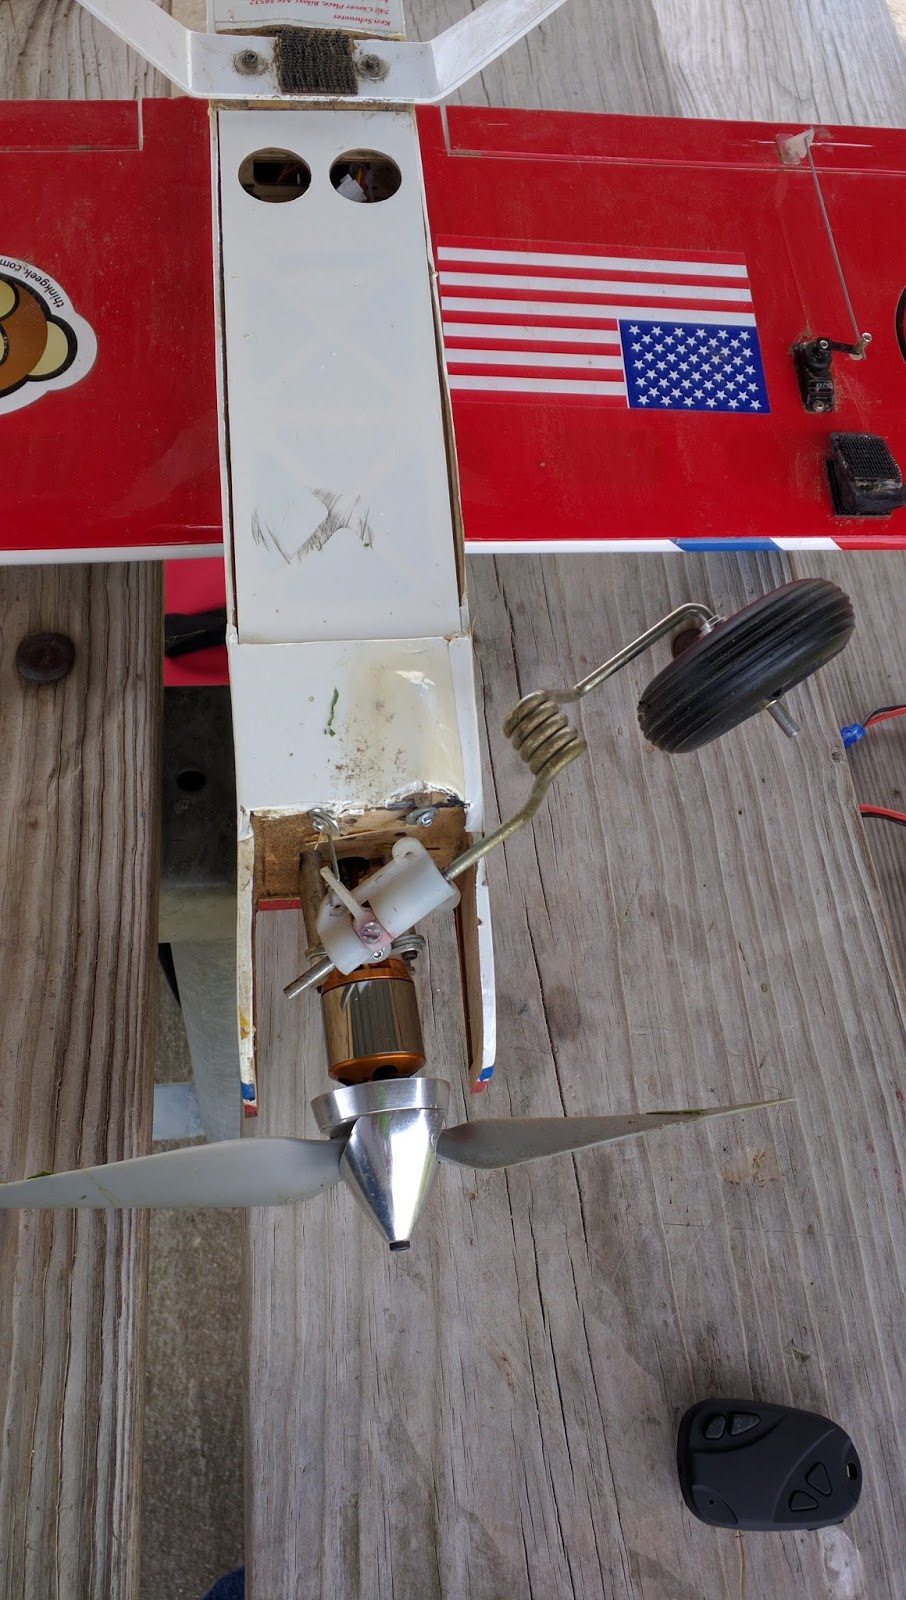
The new carb has an idle needle arm on it and it was hitting the mounting arm up there around 11 o'clock. I had to grind the arm a little to allow it to slide fully back.
The cylinder head is oriented down, so this is the underside. The throttle arm was too long and would strike the cylinder head before reaching its limit, so I had to trim off the end and use the closer hole. The small lever aft is the choke arm, and its not removable so you can't change the orientation of the lever. It points in. The choke and throttle do not hit each other and are not in each other's way.
Its pretty crowded under there. The choke arm, of course, goes forward and I used some wire to secure it to the cylinder as it goes by (not seen here). This was the only way I felt comfortable securing the throttle control arm to the throttle lever. The servo had a metal control arm, and I used a ball link to attach it to the servo arm, so this is not very adjustable.
A better look at the small choke arm with its rod, and the larger cut throttle lever. The fuel inlet to the carb adds to the crowd.
Building the new throttle servo box took a lot of time. It sits sideways now, with the top aligned with the aircrafts centerline. The arm points down. In case I ever have to change it, I wanted it to be easily removed, so I had to build a Rube Goldberg case to secure it and allow removal. It works well. I also had to rebuild the hood that houses the ignition (seen in the video, not pictured).
It took about 2 hours to get the engine tuned. I was taught to set the high needle for max RPM at full throttle, then adjust the low needle to allow smooth acceleration from idle to full. The high needle is easy. But the low needle... It was like a Chinese number puzzle. Minor adjustments of the high needle on occasion, but also adjusting the throttle limits to balance a smooth acceleration with a decent and acceptable idle, and not having problems with engine stall when quickly accelerated or decelerated. When going from full throttle to idle it dips below idle and can stall, so the idle is a bit higher, around 2300-2400 rpm, and can dip to 2100 rpm. She maxes out around 8300 rpm. And this is the final result.
The next step is cowl, and then learning to trust it.
The RCGF-USA single needle throttle system didn't work out so well, so they have abandoned it on 10cc engines shipping these days (the website still shows the old carb and detached pump). My second engine came with a standard Walboro style carb. For us early adopters there is a RCGF-USA 10cc carb upgrade kit, its about $50 shipped, and comes with everything you need. I don't like the single needle system either, too sensitive, just putting a driver on the screw could change the RPMS by hundreds, and as it broke in I started getting lags on going from low to full throttle. This was interfering with flight demands, so I pulled the trigger on the upgrade.
I removed the engine from the Sukhoi and made the upgrade the day after it arrived. The easy part was doing the removal and instillation of the carbs. It doesn't come with instructions.
There is a single screw holding the single needle carb on the engine block.
After removing the screw the carb slips easily out with a twist.
The carb mount is different, so the mounting plate has to be removed from the back of the engine. Four screws and a gasket. Toss the old gasket, the kit has a new one.
That is one "butterfly" carb mount, and one helluva sturdy shaft and counterweight.
The new carb "butterfly"/mount uses the same 4 screws. The kit comes with new screws if you want to use them. Remember the gasket. The two large bolts are the same as on most Walboros, and will be used to mount the carb to the block.
New carb "butterfly"/mount installed. Locktite everything, baby.
Carb installed. You can install it up or down, plan ahead, choose wisely, save time.
The dual needles. I removed the idle needle and unconnected the spring. Not that you can, but don't remove the spring as it helps keep the throttle body in place. It comes with a black tube and screw that you place over the old gas intake to close it off. I trim it and install it in seconds. It too is included. I didn't get a pic, sorry.
This was the easy part. It took ten minutes (five minutes was moving the darn spring), went exactly as planned.
What would take several hours, and I am still not done, is mounting it in the plane and connecting the linkages, because its arranged different and I put the plane together around the engine, and I want the needle valves on top, so I fitted the carb cylinder down as I did before, and needles up. This puts the choke and throttle levers underneath on the cylinder side. Speaking of the choke, I wish you could reverse its orientation with a screw removal like you can the throttle. It points in, which if I was using a choke servo would be fine, but as it is I will need to jockey a wire around the cylinder to reach up front.
The motor fits in the mounts with minor adjustments, though I did have to grind away a little plastic on the mount to allow the idle needle arm on the carb to not block the engine going back. I had to change the extension around so many times as I tried different orientations and linkages that the screw is worn out (hard to find a replacement. Joe, if you are reading this, can you throw one in an envelope?). I ended up having to trim off the outer hole end of the throttle arm to allow it to move its full range without stopping against the cylinder head. I am using the inner hole on the arm. I have tried a couple different throttle control linkage ideas, trying not to move the throttle servo.They all had issues of one sort or another. I finally stopped for the evening last night, worn out. I knew I would have to change the linkages, I just thought it would be more straight-forward. This is a me problem, not an engine problem. I have a plan, but will need to remove the throttle servo and figure out how to lay it on its side, and run the throttle arm fore and aft, like a a hanging leg, without too much drama. I had to change to a longer servo arm, which screwed the resolution all up but may be able to go back to the shorter original one. I will work on this tonight if I'm not dead after work, and tomorrow. Hope to run it tomorrow. More to come!
I've got my Phoeix Sim running, and with Aidan's help I can capture video! I captured this video of me flying the Hirobo Sukhoi, I think 100-150cc size, using my DX7. DR set at 100% with 40% Expo. I can't seem to get it to accept my DX7 settings for DR/Expo, and have to try to set it up model by model in the sim. USing FRAPS to capture then video, this couple of minutes is 5GB!!!
I would never have the balls to fly like this with my gassers, but I flew the Ultimate like this all the time.
As I noted in my last post, I was unusually anxious about flying for the first time at CAGS today. I had no reason to be, other than existentially. After today I realize my issue is I've lost my mojo. I have been anxious flying because I am in my own head looking for my mojo. Bad landing gear on the Sukhoi, yes, but mojo lost is not good for flying. Maybe something like knitting or cross-stitch is more my speed?
The first sign of bad mojo was the Twinstar. I put it in the car, one of the last planes I loaded. In the back of the car piled on the other planes, it slid forward and being that the nose cone for this plane is a little piece of crap, it cracked in half. Dammit. So I pulled it out of the car, and as I walked into the house I dropped it. I. Friggin. Dropped. It. I carried it in the rest of the way and took these pics.
The wings cracked in half and what was left of the nose cone completely snapped off. That's just great. So I left her behind, and instead took the Stearman. I can't remember what she has for a center wing spar, but it looks to have given way and I will need to address that. Why do I even like this plane? I mean, besides she looks cool and flies well...
I drove up to CAGS in about 40 minutes, and made it through the gate with the help of Joel, who was in one heckuva hurry and took off after letting me in. I missed the turn the first time, figured it out and arrived to find Gary Hoffman, Joel and John already flying. Matt stopped by with his little guy, for a brief visit. The winds weren't bad, a bit gusty at times, but nothing I haven't flown in before. I knew pretty quickly that I wasn't going to maiden the Spitfire, and wasn't going to fly the Stearman as it and I haven't come to an agreement just yet about who is flying her. I took the Alpha 450 up a couple of times. And that's bad mojo sign number two. I thought I would cheat the cabbage flying just above the weeds at the end of the runway for giggles, and she immediately grabbed a handful by her nose gear and flipped over.
Despite all the previous times I have tried, I finally managed to rip off the nose gear.
Okay.... So that's how its going to be. Lets start Amateur Hour then, you know, the show where I pretend I've never done this before. I fuel up and fire up the 30 CC MXS-R. After listening to the sweet sounds of the Twin DA 100 and 120's with canisters (see the vid below), my single DLE 30cc sounds like a toy, popping and snapping, loud and obnoxious. The Loud American in an Italian museum. Add to that she needs to warm up a bit to like her Idle. (Gary shared with me an interesting technique, putting in a Idle Up switch where in one mode the idle is lower by 5% for landing, the true idle, tand in the other its higher for maneuvers. I am thinking of trying that). It had been so sweet listening to those twins I wasn't sure my engine was even running right. But she was. I took her up and nervously put her through her paces, simple and easy, and I landed her. She did fine despite me. She did tend to come down a bit briskly, but I worked the wind and she would land okay, but it was clear I am not landing well. For my amateur trick, she was on the ground taxiing and her idle was high, I went to kill the ignition and let her roll in, but I hit the electric kill on the right, before I realized I had hit the wrong one she rolled by me, and headed towards the fence. I killed the ignition using the gas kill switch (which, to add to confusion, on the Spitfire is on the Aux 2 switch, something I can't seem to change). The engine stopped just before she hit the fence. Embarrassing.
My landing technique is really sucking lately. Something is in my head and my mojo is missing... I just can't seem to get it right. A couple of times I put her down hard (those gear took it fine), she'd bounce, a little power and she'd settle down sweet. That's how many of the landings went, none of them graceful. On the third flight on my second landing of that flight, she bounced, and for some reason I just stood there and watched as she stalled a foot off the ground and dropped her nose hard, twisting sideways and coming down on the side of her left landing gear, she came to an abrupt stop on her chin, then flipped over. Yeah, there's a first time for everything and this was her first true crash, and I bent that left one, broke her prop, and chipped her cowl. Bad mojo. She has never suffered any damage before, other than a prop. Fortunately at first glance its not bad. I have been working on this on the sim, which of course is way too easy...
I hung out with the boys for a while, enjoyed watching Joel, John and Gary, whose experience and skill were a pleasure to watch. Joel has some mad skills, and flew his Trex 700 with incredible talent and focus.
The flight line.
Loved these "Cholo" Wheels on Joel's Composite ARF (CARF) Yak. This is a beautiful plane, and these quirky gear and wheels were pretty cool.
Joel with his Twin DA100 equipped Yak. A professional pilot of real aircraft, and at one time a sponsored RC pilot (heli's I think), he is one of those people who just has the touch. He just knows how to make an aircraft do what he wants it to. Amazing technique, and fun to watch, fixed wing and heli.
Listen to that sweet DA 120 twin with canisters. It so smooth... Joel's Yak had a DA 100 on it, and that too was silky smooth. Made me feel barbaric with my noisy DLE 30!
My bad mojo aside, I enjoyed their company, and they were so welcoming. I enjoyed chatting at length with John whose long history in the sport is sure to rub off on me, if I get the chance to fly wth him again. He made me feel calm, and that was nice. If I can figure out how to get my application in, I am joining CAGS. I think it worth the drive every so often. Maybe more often. I have a lot to learn.
Thanks, Gary, for inviting me, and Joel and John for being so warm and welcoming! I count this as a good day.
I'm heading up to CAGS in Hopkinton, NH, just outside Concord, to try out what looks to be one 9f the best fields in the area.
I am taking the 30 cc MXS-R, which I am still getting comfortable with her, and the Twinstar, as it's nice to have one plane I am comfortable with. I am also planning to take the 10 cc Spitfire with the intent to maiden her.
I decided not to take the 10 cc Sukhoi since it's running oddly. She has decided to lag on power calls from less than half throttle. It's that single needle throttle that RCGF has abandoned, as I understand it. I have a Walboro style carb coming from RCGF-USA, an upgrade kit, and have decided not to fly her until I have that carb installed and tuned.
It's sunny now, and calm, but this afternoon will be cloudy and a bit more breezy.
I'm a bit nervous. Flying at a new field is always a bit anxiety inducing. Getting to know a field and it's members is a process. I have a feeling the pilots at CAGS are a bit more advanced, so I have a little performance anxiety too. And maidening a plane is the most nerve wracking procedure we do, as it is very unpredictable. Intellecutally I could not care less what others think, but I also don't want to be a boob...
I share this because one of the reasons I do this blog is to represent us mere mortals, the ones whose hands shake, who lose planes or damage them with some regularity, and whose skills are not professional level. I think I represent normal.
It was beautiful today out on top of the landfill today in Hudson, at SNHRCC. Clear skies, calm winds with variable gusts up to 7-10 mph.
I was all alone.
Which was good... no one to watch me screw up. The gear came off the 10cc Sukhoi, again. The MX-Bach tipped over on landing and broke the rudder hinges, the prop, the cowl and the front of the fuse where it joins the cowl. But hey, the VG's took the tip stall out! Now she just stops flying, wings level!
Before...
But it was fun, and that's all that matters. Already have the gear fixed, and re-inforced. I never really liked the MX-Bach, so I've just set it aside until I get around to being motivated to fix her. Which I will. Always do.
The wings on the MX-Bach are Sbach 342 wings. The inside wing tends to tip stall on approaches if one is at all slow coming in and turns sharp to final; straight in not so much a problem. A couple of runways I land on require a tight turn to final, so this happens a lot with this plane.
I was aware of vortex generators and how they curiously maintain laminar flow below stall, and I know that some RC aircraft have them, but I didn't know if they actually worked. A while back someone on the Southern NH Flying Eagles FB page posted a video on full scale use of VGs and a post on how someone had done them on larger scale RC aircraft using styrene L angles. There is a nice run of posts on RC Forums, including this one. Then I found this and I figured, why not see what happens!
L Angle Styrene, forget where I got it, not one of my usual RC sources.
Placed them along the 1st third of the curved chord, and decided 1.5 inch from the outer edge. I placed each pair 3/4 of an inch from one another, and 1 inch between pairs. Entirely arbitrarily placed, other than the 1/3 of the curved chord, which was the recommendation in the posts.
Each one of these is a VG, I just liked the way they look in pairs, and wanted to concentrate on the tips. I used Beacon 3-in-1 craft glue for the adhesive. Simple, strong, easy to place.
Someday soon I will see what happens with them in place!
I got out to Warner Field in Hudson this afternoon. Calm winds with some pretty aggressive sustained gusts that mostly came out of the west. Made for some intense crosswind crabs. The skies were beautiful, the field freshly cut!
I met John flying electric, nice guy, welcoming, and a pretty good pilot. Fun to watch him goof off.
The 30cc flew wonderfully!
During a highly crabbed crosswind I learned where the east edge of the east side runway is... I started to set her down knowing I was off center but would be over the runway soon, and to my surprise she started to disappear! I realized she was UNDER the runway! The whole field is on the curved top of an old landfill. The east side runway has the road that leads up to the field on its east edge, and its about 6-8 feet below the runway. From where I was standing I can't see the road, just the edge of the runway. Nosed up, landed fine up the side of the steep hill, but grounded the prop. No other damage. Changed it out when I got home.
The RCGF 10cc ran well! No issues.Had a lot of fun!
On the thrid flight, another crabbed landing. Didn't get the tail around fast enough at the touchdown and the torqued the gear off. It wasn't super secured on the front edge... Beginning to think that its my thing. Fixed it easily at home, No other damage. I did secure the front edge with a single small servo RTL Fasteners servo screw. It will hold nicely, but give under a good force keeping it from ripping off the bottom of the aircraft but giving me some resistance on tough landings.
This interesting thing happened. Twice at the field, so I grounded her and didn't maiden. When I got home I trouble shot it and realized it was acting like a power loss to the receiver. I was suspicious of the Receiver pack... I think charging my NiMH at 1C has caught up with me. I used another old pack and it worked just fine. Ordered a new pack. I have to admit I wasn't eager to maiden her in the crosswinds. If this had happened in the air it would have been disastrous. Damn lucky!
Southern New Hampshire RC Club, flies from on top of an old landfill, at the end of Old Landfill Road, in Hudson, New Hampshire. Its a bit of a drive from my home, about 23 miles, while the Southern New Hampshire Flying Eagles field in Merrimack, NH is about 9 miles from home. But its mostly freeway, so it takes about 30 min.
It was a drizzly and occasionally rainy day today, but the winds were calm in Hudson, and when they came up it was a nice crosswind from the east, consistently. I drove out, expecting to be the only one out there, and I was. It was perfect for me to get used to the field's edges, and how the aircraft look as they make approaches from the different directions. This pic is from the inner gate, on the road that winds up to the top of the landfill, up there.
Drizzly. Looking over at the West runway, electric and gliders.
Looking North. I am parked in the area between the runways.
The Alpha on the field looking to the south, on the East side runway, gas/glow and electrics on this side. This side is more expansive and just seems to go on, and on. The grass needs cutting and the field is pretty clumpy. The grass took the paint off the prop of the 30cc sized MX-Bach.
Standing on the runway, looking east.
Mud day. This is after the first flight. By the time I was done it was dripping in thick mud. All of them were.
The Twinstar. I flew her 3S, and not unexpectedly she flies lighter. 4S and she's heavy but flies well. I prefer the 3S, but need to get more than 2200 mAh, as that flies about 5-6 min. The 4S is a 3300 mAh and gave me more than 10 min. The front gear that bent so easily on the first Twinstar also bent easily in the clumpy grass at Warner.
The 30cc sized 10S electric MX-Bach. The Sbach wing has the same bad habit of stalling in slow turns on approaches and dropping the inboard wing suddenly and sharply, even with flaperons set up. I ordered some L angle Styrene to make vortex generators, and will make those and install them in the near future. It will be interesting to see if this bad habit is fixed, or I will just have to make those sharp turns at speed. You can see the missing paint on the prop. Will need to repaint and re-balance.
I flew all of these! I left 2 4S batteries and one 3S battery unused in the box. One of the 3S batteries, a blue Turnigy one, decided to increase its internal resistance into the useless zone, but other than that, this is 2.5 hours of flying one after another.
I prefer this field. I like the openness and visibility. The runways need grass work (I wish I could find those fields you always see in the mags with the putting green grass smoothness...). The club knows this and is working on a plan. Long approaches from both ends, more so from the north, and I prefer flying on the east gasser side. Merrimack is nice, especially with the geo-tex runway, but the entire flight is flown above the tree line that creates the hole you fly out of. Nasty steep approaches from the south, and tight approaches from the north, in Merrimack. I do like being there though, so will likely keep memberships at both fields for now. I liked having the aircraft back in front of me again, like I enjoyed at MCRCC in Gulfport, MS, where I learned to fly.
In order to get the cowl on the pipe on the muffler had to be trimmed about 1-2 cm. This short stack sprays the airframe with oil... I don't think it affects performance much.
On the 30cc DLE I used rc car muffler couplers as extensions and they work awesome. I found a couple of options for the Spitfire and tried them out this morning.
This is the full car extension, comes with a short coupler and the extension. The bent pipe is soft silicone, but is about 6 mm or so ID. The muffler pipe on the engine is 10mm ID. Thats a 40% loss in diameter, and Poiseulle adroitly predicts a significant increase in resistance to flow (1/r4). I expected some significant back pressure and figured on some rpm loss.
This lasted 3 min. The solder bead I had on the muffler melted off as I expected it might, and the engine threw the extension and coupler off. She immediately gained the almost 500-600 rpms she lost due to back pressure. So much for that one...
So I went with just the longer coupler, and she runs fine. It gives me that 1-2 cm back, but I suspect there will still be some oilage. RPM performance is maxed, around 8200 rpm at full.
I hope to maiden her out in Hudson next week. Need a good clear, calm day.