And AWAAAAAY we go!
Thought these servoless retracts were $17 a piece from Hobby King. Nope, a pair, says so right there on the listing, so I have an extra set of retracts.
The box, she be opened. No ghosts or wights came out, whew....
Fuel proofing on the front inside of the fuse drying. I kinda sm stalling...
Wing one. Let the games begin.
Painting the wheel hubs white, the flap well is primed, will be painting it red.
Tip: I learned before to put the flap control horns on first, then install the flaps. To do this the servos had to go in first so I could know where the horns would go. I amusing Tactic 47s from previous models.
Wings are done! Took about 3 days, mostly due to issues getting the landing gear to work right (see below).
Red came out great! Not sure how I am going to set up the flaps... They are on a Y, so I am not sure how I will get the end points to match. I don't remember how I did them before. I am using an 8 channel receiver.
I wonder if I should leave the landing gear cover off to keep the underside of the wing flat and unobstructed? The gear is well into the wing with the changes.
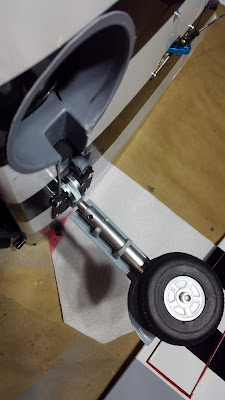
Once again putting the non-stock servoless retracts on took a lot af work, trial and improvements on first takes. I haven't done them quite the same on any of the three models but this approach worked the best. The issue is they are full 90 degree retracts, and if it binds at less than 90 retracting up, it gets stuck, won't budge, and is locked.had to remove them to let them unbind. That's how I figured out what the problem was. I had to raise the hardpoint the thickness of a popsicle stick, which I tailored two for each gear. Further I had to make a round hole in the center of the wheel well creating another 1 cm of space by allowing the head of the bolt holding the tire on to pass through and a bit under the well. Lastly I had to trim one of the gear cover support brackets so it wouldn't bind on the gear retract body. Now they work perfectly! Took some tiresome trouble shooting to figure this out, and the differnt sites causing binding.
As with the last two Spittys I had to cut the back off one of the gear cover supports so the gear could retract completely, not blocking full retract by running into the body of the retract.
My, that is a big bolt head right there... It ran into the wheel well cover before it fully retracted, causing binding. Partly relieved by raising the hardpoint, and by making a space for the bolt head in the bottom of the well,
Melted with soldering iron then Dremel sanded a hole in the center of the wheel well for the gear bolt. The underside of the wing is several mm deeper, more than enough room for the bolt. I located the spot by removing the wheel and reinstalling the volt by itself and seeing what it ran into. Made the hole there.
Taking a break. Next how to fit everything in. Using a single LiPO with a Tech-Aero UltraBEC, saving space and weight. I am going to use a Hobby Eagle 3-Axis stabilization system on it*. Not sure where that's going. The receiver is a big Spektrum AR8010T with a sat. Not sure where that's going either.
More adventure to come!
* Um, nope. Says specifically not for glow/gas aircraft. This solves another problem, lets me assign separate flap channels if I need them.


No comments :
Post a Comment