The start. Held on by a small piece of cote...
Divided the sections and removed the electronics. It was a fairly clean break, but a lot of the pieces were shattered into chips.
I decided to start by reinforcing the existing firewall. It was crushed in one spot but unbroken. I used a lot of popsicle sticks on this rebuild.
I decided that a popsicle stick down the side with one cross member would reconstruct the battery box/nose section frame nicely.
The shelf wasn't going back in, but I could build one out of popsicle sticks, but they had to go in with a bit of a V shape.
I wonder how this is going to work at the main body end? I fit the sections together and the shelf sticks were a bit long, but would work marvelously!
Now I had to turn my attention to the body. I trimmed back the sheared off sections to give me a more square boundary.
I created a strong joint surface with popsicle sticks.
The check fit the sections together. Spot on! I was using the bottom connections to indicate to me the length the nose section would require.
I CA''d a couple of match stick spars, and CA'd the sections together. I filled in gaps with scrap chips and CA'd them into one piece, more or less.
Same with the other side.
I slipped a piece of sheet balsa trimmed to fit wall to wall along the length and breadth of the nose section.
I used the shelf as a width wise securing joint with CA.
I hand drilled a lot of holes in the sheet balsa. I used a piece of tongue depressor across the section. You can see how I cut the popsicle stick V shelf a bit short. I couldn't measure it and came up a bit short. Using the balsa sheet shelf as a joint surface overcame that mistake.
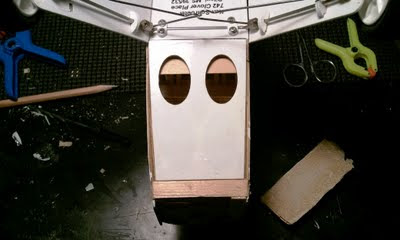
I put the battery cover on, perfect fit! I got the section's length perfect. Under the air holes of the cover you can see a piece of popsicle stick running width wise. I needed to strengthen the underside of the nose section with this cross member as the bottom sections had sheared at this joint.
I added a small rectangle of sheet balsa to either side over the piecemeal upper joints to consolidate the connection and strengthen as well as smooth it out.
Here's the other side.
I will let it sit tonight, inspect it in the morning and cote it all white tomorrow. Not sure how I will redo the red stripes. They were printed on the original cote. I will likely continue it forward with some kind of single strip of red.
The cowl took a beating, lots of cracks, no complete breaks. I have CA's the cracks, and will likely epoxy them tonite. Plan to repaint it tomorrow. I think it's going to look pretty good. Will need to recheck the CG after reinstalling the electronics. I had an AR 6100 on this bird, but will be replacing it with an HK Orange receiver and satellite receiver. I think the Master Airscrew props will be arriving in the mail tomorrow, and she'll be ready to fly again. Hopefully the two of us will figure out our relationship and the flying will go well, perhaps Wednesday? Yay!


Impressive. Whenever I look at your photos of these planes and their windows, I keep thinking you need little stick people drawings of a pilot and passenger!
ReplyDelete