The flying monkeys got me...

Helis, Fixed Wing, RC Sailing

AMA 957918

Pirate Kid Skeleton by RadDezigns.

Friday, July 22, 2011

Asleep at the switch...

The Alpha 450 has finally sustained a major crash, but it wasn't as bad as it could have been. Thing is, it shouldn't have happened at all...

Luke was flying on the Buddy Box and was doing such a good job that about 8 minutes went by without my having to intervene at all. I was enjoying his success and cheering him on! So when he finally got into an orientation he couldn't get out of, it caught me by surprise. No problem, we were still high. "I got it..." Wait, I'm not getting any response to my inputs! She's diving straight down! Heart pumping, cold sweat, not breathing... WHAT THE HELL IS GOING ON! SHE"S DYING! I suddenly realized I hadn't let go of the trainer switch, Luke was still the pilot, and he was shaking his sweaty hands dry watching the emerging disaster! I let go of the trainer switch, gaining control just in time to break the dive, but not in enough time to remain airborne. She struck the ground hard with a glancing blow and a nerve wrackingly loud thump... I knew I had flattened out the trajectory, but I wasn't sure it was enough. It was a long hundred yard walk through the blackberry field to the hills of Mordor. I still wasn't breathing, saying a soft prayer to the Flying Spaghetti Monster hoping it wasn't too bad, so I didn't think to get a photo of the crash site... (You'd think I have been blogging long enough to remember by now...).

The wing had popped off cleanly, knocking out one of the front pegs and shearing out the aft wing mount. The wing itself was unharmed. The motor was bent upwards and the firewall crushed in at the top. The metal X-mount was bent, but curiously the prop was intact. The motor hand turned cleanly, but later I would see that not just the prop adapter was bent, the motor shaft was too just outside the outrunner. (I removed it, tried to straighten it, but then the motor outrunner now rubbed against the stators. It was toast). I repaired the wing mount with CA and epoxy, rebuilt the firewall with chips and popsicle sticks (very useful things, those popsicle sticks), and some salvaged plywood. Its not pretty but functional. I ordered a Poweup 450 Sport motor from HeadsUpRC(my favorite parts supplier) to replace the Eflite 450 motor. A more powerful 450 motor at half the cost. I decided that with a more powerful motor, I would take a 40A ESC from Frankenheli and put it in the Alpha, so I have removed the Eflite 25A ESC.

I also took the opportunity to change the front white LED of the Turnigy nav lighting system (more on that later) to a forward pointing alignment, and built a curved housing over it.

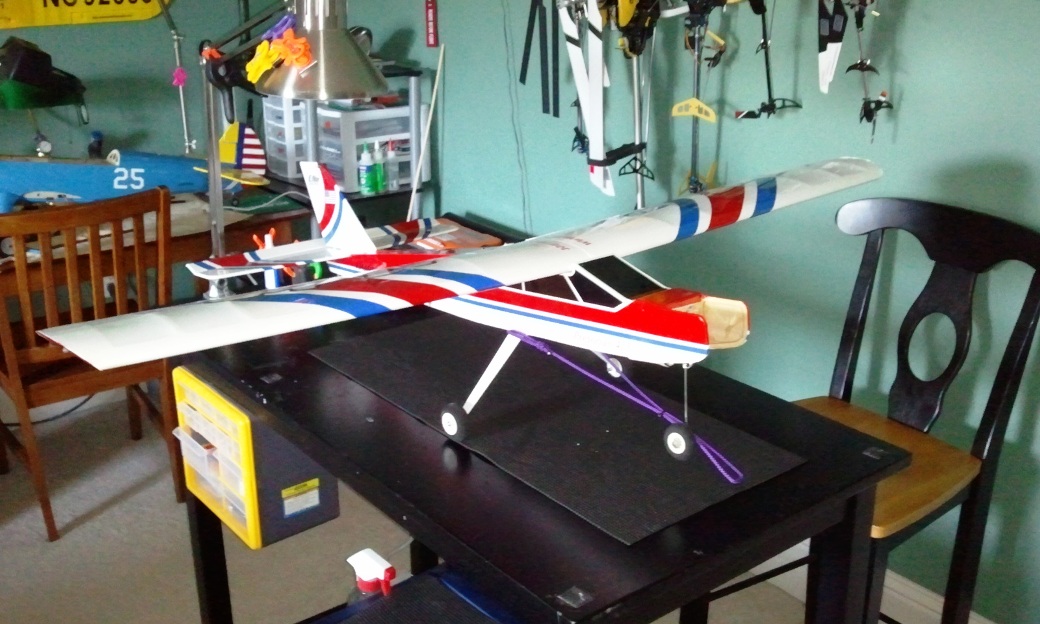
All in all it looks pretty good, albeit not scale perfect! The motor should be here soon. Luke and I will be back in the air, and I will stay awake at the switch!


The post crash pic...


Pieces of popsicle stick strengthen the front of the firewall. The entire top section (with the two blind nuts) was crushed back into the fuselage.


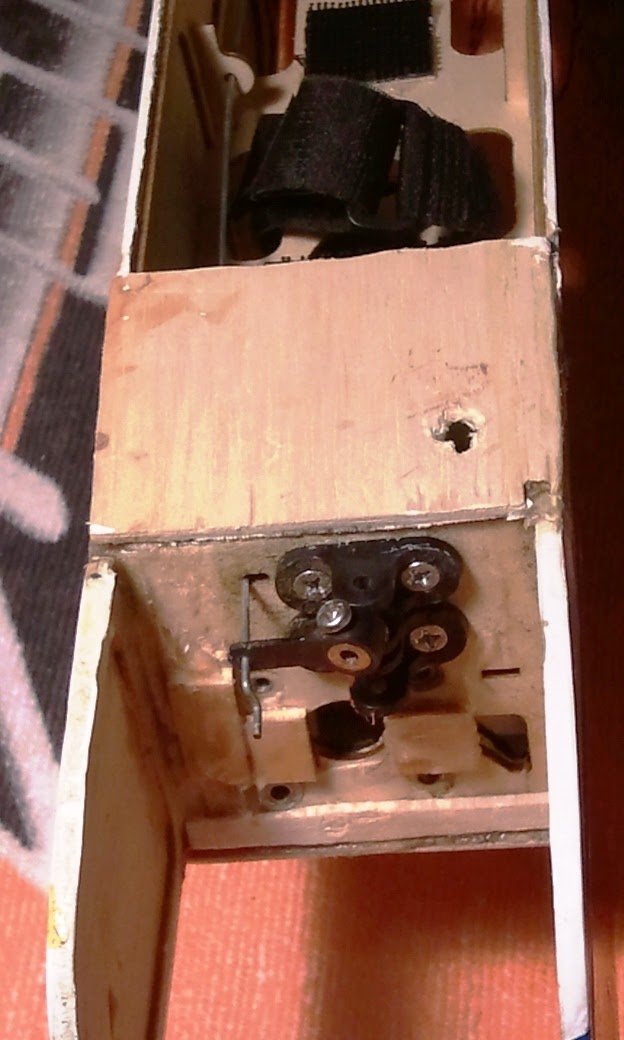
A view from below. The opening for the forward nav light.


View from behind the firewall. I would later put a cross piece along the bottom of the front cover, where a piece is clearly missing.


The aft wing mount was sheared cleanly off the plane. I replaced it with CA and buttressed it with epoxy. The top of the forward aft fuse behind the mount was also broken off. I removed the cote and rebuilt the balsa, and squeezed some balsa chips into any remaining gaps. CA the whole bugger, as Greg Reed recommended, I drowned it all in CA. Thank goodness for the 20g Locktite CA.


Built a sheet balsa enclosure for the forward nav light, which I wanted to be forward facing. I didn't think of doing this mod until I had coted the cover. I removed the cote and recoted it. 


To get a smooth finish, I used dry wall spackle. I sanded it as smooth as I could, but couldn't get it just right. The hard part was getting cote to lay down over it smoothly over the curved surfaces. I think I can do a better job next time.


Dried and sanded Not so good with the smoothing.


Try as I might I could not get the cote lay down wrinkle free. I tried a variety of application methods, and think I can get it right next time. I can make this look a lot better.


I was using a Velcro strap across the bottom of the plane to keep the battery hatch in place. The magnets work well, but they can let go in a hard G maneuver, and I don't want to lose the cover. I don't like the Velcro strap on the outside, so I put in a cross bar (popsicle sticks...) and laid some Velcro across it and the hatch. Works nicely.


She looks very good post repairs!


Waiting for the motor. Can't wait to take Luke back up on the box. I don't think it will be long before he is doing takeoffs and landings as well!

Tuesday, July 19, 2011

My Flying Buddy!


Me and Luke on the buddy Box flying the Alpha!


Luke and the Alpha! A fast learner he was flying most of the time by the end of the day.

Field Test of the Arrestor System


I took the arrestor system out to BMF and tried to land the Alpha on it. Try as I might I couldn't land the Alpha on the device, it's just too big. I did come awful close. If I was able to fly from a position in line with the device I think I could do it. The device might be too small even for a small foamie at 2 ft wide. I may double it,  but the idea is to have something easily portable and challenging and making it bigger means, well, bigger, and less challenging. I got one pack of mats for proof of concept, and it actually is really level. I think it will work fine. I am going to continue to try it at 2 ft, see if I can get some of the small foamie guys to shoot landings, and see what they think.

Monday, July 18, 2011

Getting Arrested...

As part of my foam rubber runway project, I wanted to create a simple cable arresting system that could lie on flat ground. This is what I have come up with. I have no idea if it will work, but expect it to work just fine on small foamies. When I incorporate it into the runway system I will likely use wire tent pegs to hold it down.


1 inch x 2 inch blocks cut and drilled to hold eyelets. These are the cable guide blocks.


My garage became the painting room. I painted both surfaces of the main board to protect the wood against moisture from the grass.


To make lines to show where the wires are, I placed 2 inch masking tape where the yellow lines will be. I then used masking tape to create the edges, then removed the 2 inch tape. I used the soft non-textured side of the foam mat. Its that 2x2 puzzle edge stuff for workshops or gyms.


Some extra masking and I was ready for spray paint. In the future I will use brush on paint and a roller. This took way too much time and too many coats to get it even.


The humidity got so high in the garage... I moved painted items to "the drying room".


I wanted to edge the yellow lines with black. I used a Magnum marker and a straight edge.


I would need a small block to lift the cables. I cut some scrap spar wood into 20mm pieces and used a glue stick to temporarily hold them on a piece of cardboard for painting.


Liberal coat of black paint from a rattle can. In 10 minutes they were dry and I plucked them easily off the board.


I cut the puzzle ends off the sides of the foam runway piece, leaving it on the ends to join to the runway. The black lift blocks are CA'd onto the foam. I installed the eyelets and then epoxied the blocks to the board. Originally I was going to have the eyelets facing up, but this lifted the cable higher than I wanted it, so I laid them on their sides (and used that Magnum marker to color the back), and came up with the lifting block idea to give me about 5-7 mm clearance.


For the larger arrestor hook, I took a picture hanger hook and broke off the nail end. I soldered it to a control rod using a torch.


I covered the hook and the soldered section with shrink wrap. The proximal end is a clevis attached to a backwards control horn, which is CA'd to a piece of scrap plywood also colored with that marker. To that i have attached a piece of 3M Dual Lock Velcro. This is attached to the plane. I also made a small one.


I don't have a small foamie so I put the arrestor hook on the camera Dual Lock on the bottom of my Eflite Alpha Sport 450. It will hang down... It may hang up on take-off from grass. I could rig a servo to release it, but I don't know that I plan to routinely land the Alpha with with arrestor hook.


The arrestor system in repose.


A soft spring (Home Depot) attached to a plastic wall hook secured to the board using VHB, with a thin bungie (Walmart craft section), running through the eyelet across the runway, and tied off on the other side. I alternated every other side  for looks and to keep it from being crowded.


Can't wait to see if it will work!

Next up, the long runway!

Sunday, July 17, 2011

Buddy box with my Buddy!

Luke and I hit the field yesterday, squeezing in a couple of flights between the rain drops before the thunderstorm came in. Setting up my two Dx6i as master and slave was so incredibly easy. When I read the instructions in the manual, I couldn't believe that was it. I connected a Radio Shack 3.5 mm double male ended stereo cable into each transmitter (tx), made sure the identical model and settings were on each tx, and figured out which was master and which was slave. I remembered that the slave (student pilot) tx was the one you leave off (it turns itself on when you plug the cable in). The instructor holds the trainer switch on when the student is flying, and lets go when he neds to take control. It was incredibly easy! Luke and I had a blast and now have an active way for Luke to fly without having to wait for an instructor pilot from the club to be present. Awesome!


Two Spektrum Dx6i and a double male 3.5mm stereo cable for $8 from Radio Shack.


Close up of my cable. Radio Shack's website shows molded ones for $8 in a variety of different colors.


The stereo cable is connected to both radios in the back.


The left is OFF and is the student's (Slave), the one on the right is ON and is the Instructor's (Master). I noticed if I turn the Master off nothing changes on the radio (it stays on), but I don't know if it changes the Master status.


Note that the one on the left is OFF, the right is ON, and the identical model is on both. The DR/Expo, Subtrims, everything, need to be identical. The airplane will adjust itself to the flying radio's settings. 

That's all it takes! A cheap cord, two radios and volia!


Friday, July 15, 2011

Stearman makes progress

I have done a lot of work on rebuilding the Stearman after her stall crash. The motor mount was crushed, but I rebuilt it piece by piece with CA and epoxy.


It came together pretty well, though some chips and pieces were missing. I supported the structure with pieces of balsa and ply, and installed the firewall and mount on the fuse using CA to get it into position, and epoxy to strengthen it.

The slots and structural support for the landing gear really took a hit.The fuse wall was crushed into the fuse where the landing gear jackets pushed into the fuse. I pulled the fuse out and filled it in as I could, using CA and epoxy. I couldn't get the landing gear plate completely flat. It had buckled a bit and I couldn't get any leverage to push it back. The plywood was bent, but not broken. I pushed it into place as well as I could, but its not perfect. The residual is that the gear pant on the right side doesn't fit flush, but it looks really good. I ironed in the new blue Ultracote. Looks really good!


I will install the motor and ESC and run a motor test. All that is left is to order and install the cabane struts, the upper wing carbon fiber support rod, the wing N struts, and the cowl. I will need to rei-nstall the weights to get the CG again, I suspect with some less to account for the epoxy in the motor mount.

MX2 Rebuild Continues

I am still working on the MX2. A couple of days ago I epoxied the ply firewall back together. Yesterday I epoxied the firewall in place and brought together with epoxy the shattered fuse. I had noticed back when this rebuild started that the fuse curved from left to right (right to left from the nose). I had been thinking about this for a while, and today I sliced the fuse at its thinnest point and wedged in and epoxied some dense styrofoam. This worked and the fuse is now aligned.


The angle is more acute when you look down onto the fuse. After the wedge its straight on.


The white wedge of styrofoam bends the fuse back into alignment.

I plan on filling all the holes and gaps with epoxy, sand it down, and paint the fuse one whole color. I may paint the bottom that bright green. I pounded the metal motor mount back into shape and will install it and the motor soon.