The flying monkeys got me...

Helis, Fixed Wing, RC Sailing

AMA 957918

Pirate Kid Skeleton by RadDezigns.

Saturday, June 18, 2016

Huh... that was curious.

So this happened the other day...

One moment we are flying our second tank of gas in a brisk wind, the next minute we weren't. The wind was to my back and I had idled the 30cc MXS-R so couldn't hear the engine at idle. I noticed that it had quit too late, when I realized I was looking at the prop. Too low, in a turn into the wind. Ran out of altitude because I was flying at Mt Hudson and had to flare as she disappeared from view as she was going down the uphill at the end of the runway. Recall this runway is on the top of a landfill dome, so slopes hard at both ends, especially the 36 runway with an approach from the south, a steep 45 or more degree drop off.

I found her in the deep grass having only ripped off her landing gear.


I'll get those fixed in the next week or two. It'll take a major rebuild of the undercarriage. Then I will try to figure out why she suddenly quit.

To windy to maiden the Spitfire again, but I had problems with her tuning again when I decided to run her. I also noticed fuel and air bubbles coming from the gasket between the cylinder and the carb, so will need to take that apart and re-tighten it.

Flew the 10CC Sukhoi fine. She didn't like the wind on landing, and her rudder tiller broke off making her tail wheel castor.  I only flew her about 3 times before I decided that was enough for the day.

Its disappointing. There is always a brisk wind at Mt Hudson, but down below it was 1-2 mph. And I wish the runway was a little longer without the drop off.

Tuesday, June 14, 2016

VQM P-51 Rebuild Update

I've been making some solid headway on the rebuild of the VQM P-51 as an electric.


I removed the damaged cote repair and put invasion stripes on it, just on the right wing. They came out beautifully!


To increase the airflow, along with the aft vent, I opened up the smile under the spinner.


The installed fixed landing gear. I have servoless retracts that fit this plane, so I wanted to install them in place of the fixed gear.


Oddly, the mount space is not aligned with the strut space.


So I modified the mount space to allow the slight angle.


I then painted the insets.


Cleaned up nicely!


The retracts installed.


I made covers for the machinery ends.


Coted them and installed them using RTL Fastener servo screws.


Close up.


Sweet, deeply flush fit. This is a front on view with the gear retracted.


Gear extended.


I put a twin blade on, starting with a 14 x 8 and then a 17 x8, used a 5S and a 6S battery, and checked watts. I was stunned that the 14 drew only about 250W!  The 17 drew almost 700W. I expected more. It was impossible to find a 4 blade scale prop... I then went looking for a "replacement" for a similar sized foamie, and came across the FMS 1700mm P-51 on Motion RC. Initially they had the blade sets, but no spinners, but those came in! I ordered two sets of blades and one spinner.  I am excited to have a nice 17" four blade on this plane, making it really real like!  The 5065 motor shaft isn't tapped in the center to accept the spinner screw, so I had to locate and order one. Motion RC was NIS, but Horizon Hobby had them. They are on their way. Hope it fits my motor.

Still waiting for my Hobby King order...  I ordered the servos from Hobby King about 8 days ago, and yesterday they just left the warehouse. Hobby King's USA warehouses have been SOOOOO FUCKING SLOW getting stuff shipped that I struggle to order things from them. I have gotten stuff from their Hong Kong warehouse in the time it takes to get stuff from the US. I am really disappointed. HK Hong Kong is good, if not overly so, about sending emails updating you on the status of your order right up to your door. The US warehouses email acknowledgement of your order, but then nothing. I had contacted HK twice about the status of my order before it suddenly showed up as shipped.

All that is left is getting the servo's and installing them. I am hemming-and-hawing on using the BEC on the ESC or tapping in one. I ordered a 6V 5A one, and will likely tap it in and use it for power to the electronics. I am using the 3-Axis Receiver that will probably like having plenty of juice.

Speaking of juice... I found a great deal on 6S 4500 mAh batteries for about $42 a piece, and picked up 4 of them on eBay. Psych!

When the guy from Hobby King arrives on his bike from Oregon with my servos, I'll post another update.

Tuesday, June 7, 2016

VQ Models P-51B - A Used Airframe Rebuild

Amaadur Rahman, a fellow RC Pilot from SNHFE in Merrimack called me a few weeks ago and told me he had been given a VQ Models P-51B Mustang airframe that was in good condition (the wings actually measure 61 inches). It was too big for him to transport, and he thought I would enjoy repairing and setting her up, so he gave it to me! Thanks, Amaadur!

It is in pretty good condition. I am going over it carefully and am trying to keep my costs down. I have on hand a Hobbywing 100A ESC, and a HeadsUpRC 5065-04 1400 watt motor (at VQ Models estimated 7 lbs AUW, thats 200W per pound. My other choice was a 700W motor, and ain't nobody got time for 100W per lb. But that max watts is likely on a 8S battery, and I am flying it 5S, so it will be interesting to see how many watts it ends up drawing). I also have an Orange RX 3 axis stabilized receiver, brand new.

I want all metal gear, digital servos, so today I ordered 4 Corona DS329HV Digital Metal Gear Servos, and a Turnigy 5A 6V SBEC. I have 4 5S 4500 mAh batteries that may need replacing, and one 6S that likely does need replacing, and they fit. Someday I will, but once I know what she likes. I am also replacing those ugly fixed gear for retractables. I have the same servoless retracts I used on the Spitfire, and today ordered a set of struts that are for the Spitfire as this about the same size, from Tower Hobbies. They are updated from the ones that came on my Spitfire and are rather cool looking.

Today I started on the fixin' up.


The model is in pretty good shape. I can't match the stock cote, so I decided that I will put D-Day stripes on that right wing.


Its a sign that the pilot came loose, and I had to re-install him. The canopy came off easily and he's now sitting proud.


I wanted a bigger tail wheel, so I swapped it out.


The cover was on wrong and wasn't flush, so I fixed that. The tail wheel was loose on the turn thingy, so I changed out the set screw for a screw-screw and snugged it up as best I could. Leaving the weights on for now.


I rebuilt the cover and the doors and coted it. Snazzy.


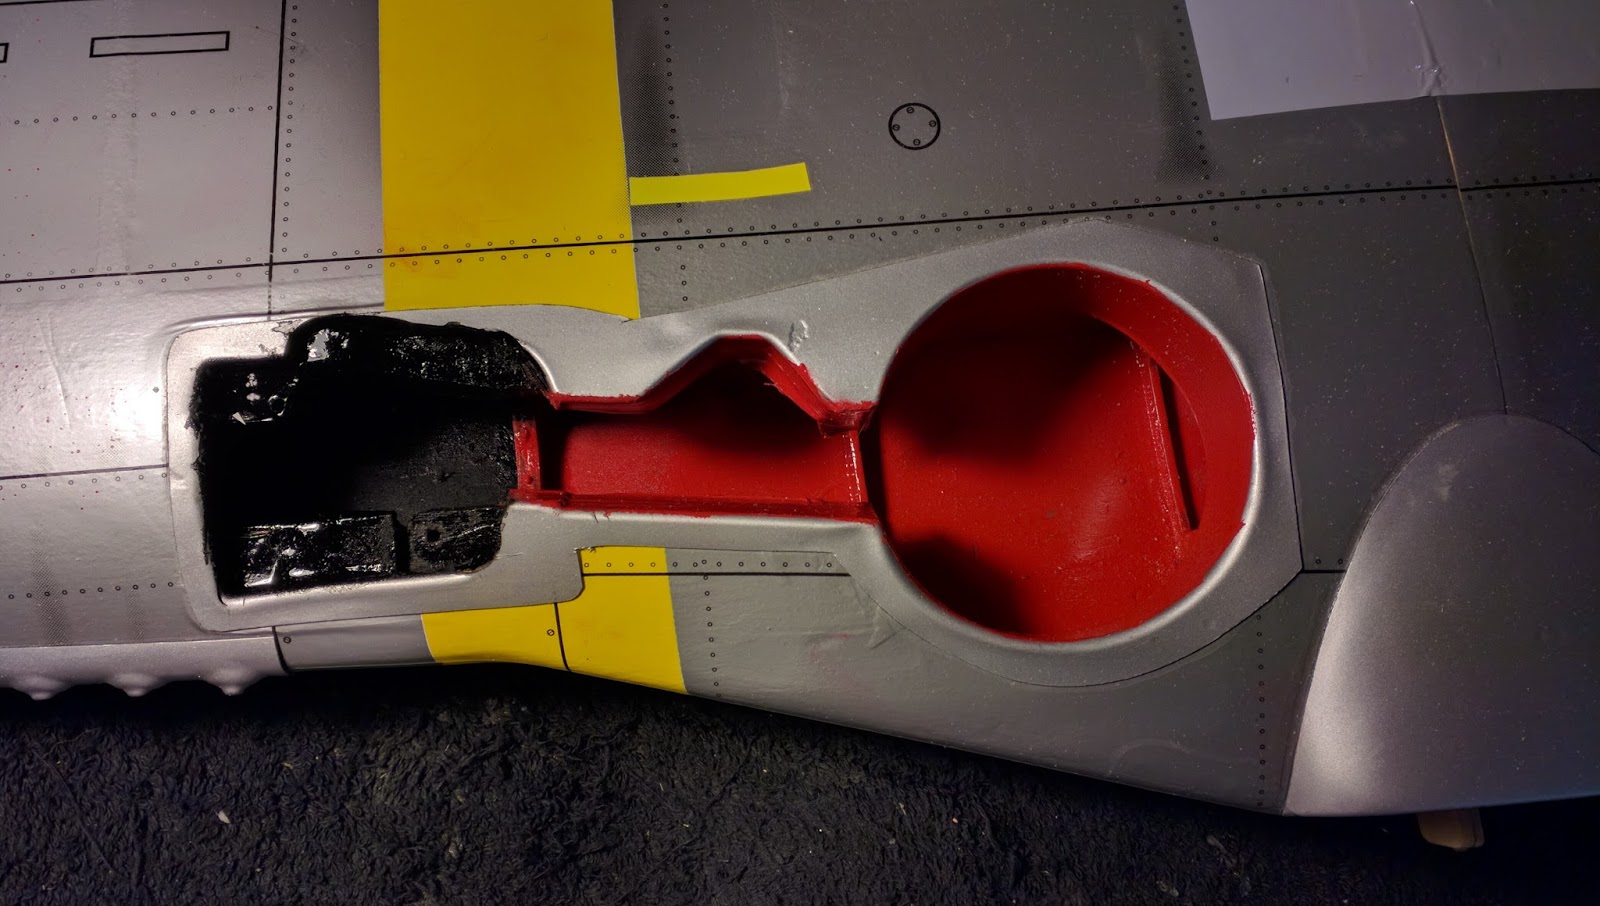
Curiously there is no vent. Electric aircraft, especially one with a huge motor and ESC need a lot of airflow and most have an aft vent to allow flow-thru of cooling air. So I decided I would cut a vent hole and use a vent cover from an Eflite Pulse 25XT that I painted. Marked out the opening.


Opening made. There is nice continuous airflow, but I will make an opening in the cowl under the prop.


Epoxied for strong hold.


Vented.


The wing-fuselage cover is broken and I wasn't sure how to fix it...
I decided to use foam and wood filler.


Trimmed a piece of painters tape to mark the curve.


This is the dense wood filler I am using. I don't want to fill the entire space with it, so trimmed some foam...


And stuck it in the hole.


Then filled it with wood filler. A few hours later I light sanded it, and this weekend I will finish it. I am hoping the silver paint I have is a fair match. Its a warbird, it doesn't have to match. Not sure if it won't fall off as it won't flex well.


I installed the motor. Pretty much fit the stock holes.


I epoxied the battery tray (behind the clamps) as it was loose, and made a small cross piece to mount the receiver, here being epoxied under the clamps.


That's pretty much it for today. This weekend I will finish off that wing cover and make the vent opening in the cowl then install it. I will start repairs on the wing cote and put those invasion stripes on the top, and install the retracts, and when the struts come in those too. Same with the servos, the SBEC, and the receiver. They should all be here in the next couple of weeks! I think she is going to be a great flier.


Saturday, May 28, 2016

Twinstar back to flight status

There was that day last week where I took up knitting. Part of the excitement was dropping the very fragile (now we know...) Twinstar, having the nose cone shatter and the wing crack in half, breaking the spar and the small thing that stuck out of the front securing it to the fuselage.

I put the wing back together, made a new notch thing, and after a couple of days I laid down two layers of fiberglass cloth using epoxy resin. Let that dry a few days and then today I sanded it smooth, covered it with white cote. Smooth as a baby's bottom.


Nice glass work! The middle 4 inches is fiberglass.


The nose cone arrived just as I finished the wing and reinstalled it onto the plane.

She is ready to fly again!

Thursday, May 26, 2016

RCGF-USA 10cc Walboro Carb Installed and Tuned

I upgraded the carburetor on the original RCGF-10CC with the single needle throttle/detached carb after purchasing the upgrade kit from RCGF-USA. Updating the carb itself was easy. Installing it back in the Sukhoi and tuning it took a couple days and some MacGyvering.

I didn't like the single needle as it broke in. It was touchy, and started becoming more difficult to keep tuned. She started to lag on throttling up from idle to full, and I couldn't tune it out. So, upgrade.

The single needle was a choke-less carb. The single needle was in the middle throttle body, and the control rod attached on the same side, you adjust it for high RPM, and hope the low end takes care of itself. This was on the underside of the engine when I originally installed it, and the throttle servo was set up on the top. My history with the Sukhoi and the RCGF-USA 10cc is here.

I had a plan for the re-install. It didn't go as planned, and I ended up having 2 main problems to overcome and improvised as I went along.  I had to rearrange the throttle servo and its case, and re-design the throttle control arm.


The new carb has an idle needle arm on it and it was hitting the mounting arm up there around 11 o'clock. I had to grind the arm a little to allow it to slide fully back.


The cylinder head is oriented down, so this is the underside. The throttle arm  was too long and would strike the cylinder head before reaching its limit, so I had to trim off the end and use the closer hole.  The small lever aft is the choke arm, and its not removable so you can't change the orientation of the lever. It points in.  The choke and throttle do not hit each other and are not in each other's way.


Its pretty crowded under there. The choke arm, of course, goes forward and I used some wire to secure it to the cylinder as it goes by (not seen here). This was the only way I felt comfortable securing the throttle control arm to the throttle lever. The servo had a metal control arm, and I used a ball link to attach it to the servo arm, so this is not very adjustable.


A better look at the small choke arm with its rod, and the larger cut throttle lever. The fuel inlet to the carb adds to the crowd.

Building the new throttle servo box took a lot of time. It sits sideways now, with the top aligned with the aircrafts centerline. The arm points down. In case I ever have to change it, I wanted it to be easily removed, so I had to build a Rube Goldberg case to secure it and allow removal. It works well. I also had to rebuild the hood that houses the ignition (seen in the video, not pictured).

It took about 2 hours to get the engine tuned. I was taught to set the high needle for max RPM at full throttle, then adjust the low needle to allow smooth acceleration from idle to full. The high needle is easy. But the low needle... It was like a Chinese number puzzle. Minor adjustments of the high needle on occasion, but also adjusting the throttle limits to balance a smooth acceleration with a decent and acceptable idle, and not having problems with engine stall when quickly accelerated or decelerated. When going from full throttle to idle it dips below idle and can stall, so the idle is a bit higher, around 2300-2400 rpm, and can dip to 2100 rpm.  She maxes out around 8300 rpm. And this is the final result.


The next step is cowl, and then learning to trust it.

Wednesday, May 25, 2016

RCGF-USA 10cc Carb Upgrade

The RCGF-USA single needle throttle system didn't work out so well, so they have abandoned it on 10cc engines shipping these days (the website still shows the old carb and detached pump). My second engine came with a standard Walboro style carb. For us early adopters there is a RCGF-USA 10cc carb upgrade kit, its about $50 shipped, and comes with everything you need. I don't like the single needle system either, too sensitive, just putting a driver on the screw could change the RPMS by hundreds, and as it broke in I started getting lags on going from low to full throttle. This was interfering with flight demands, so I pulled the trigger on the upgrade.

I removed the engine from the Sukhoi and made the upgrade the day after it arrived. The easy part was doing the removal and instillation of the carbs. It doesn't come with instructions.


There is a single screw holding the single needle carb on the engine block.


After removing the screw the carb slips easily out with a twist.


The carb mount is different, so the mounting plate has to be removed from the back of the engine. Four screws and a gasket. Toss the old gasket, the kit has a new one.


That is one "butterfly" carb mount, and one helluva sturdy shaft and counterweight.


The new carb "butterfly"/mount uses the same 4 screws. The kit comes with new screws if you want to use them. Remember the gasket.  The two large bolts are the same as on most Walboros, and will be used to mount the carb to the block.


New carb "butterfly"/mount installed. Locktite everything, baby.


Carb installed. You can install it up or down, plan ahead, choose wisely, save time.


The dual needles. I removed the idle needle and unconnected the spring. Not that you can, but don't remove the spring as it helps keep the throttle body in place. It comes with a black tube and screw that you place over the old gas intake to close it off. I trim it and install it in seconds. It too is included. I didn't get a pic, sorry.


This was the easy part. It took ten minutes (five minutes was moving the darn spring), went exactly as planned. 

What would take several hours, and I am still not done, is mounting it in the plane and connecting the linkages, because its arranged different and I put the plane together around the engine, and I want the needle valves on top, so I fitted the carb cylinder down as I did before, and needles up. This puts the choke and throttle levers underneath on the cylinder side. Speaking of the choke, I wish you could reverse its orientation with a screw removal like you can the throttle. It points in, which if I was using a choke servo would be fine, but as it is I will need to jockey a wire around the cylinder to reach up front. 

The motor fits in the mounts with minor adjustments, though I did have to grind away a little plastic on the mount to allow the idle needle arm on the carb to not block the engine going back. I had to change the extension around so many times as I tried different orientations and linkages that the screw is worn out (hard to find a replacement. Joe, if you are reading this, can you throw one in an envelope?). I ended up having to trim off the outer hole end of the throttle arm to allow it to move its full range without stopping against the cylinder head. I am using the inner hole on the arm. I have tried a couple different throttle control linkage ideas, trying not to move the throttle servo.They all had issues of one sort or another. I finally stopped for the evening last night, worn out. I knew I would have to change the linkages, I just thought it would be more straight-forward. This is a me problem, not an engine problem. I have a plan, but will need to remove the throttle servo and figure out how to lay it on its side, and run the throttle arm fore and aft, like a a hanging leg, without too much drama. I had to change to a longer servo arm, which screwed the resolution all up but may be able to go back to the shorter original one. I will work on this tonight if I'm not dead after work, and tomorrow. Hope to run it tomorrow. More to come!

Sunday, May 22, 2016

Phoenix Flight Sim 5.5

I've got my Phoeix Sim running, and with Aidan's help I can capture video! I captured this video of me flying the Hirobo Sukhoi, I think 100-150cc size, using my DX7. DR set at 100% with 40% Expo.  I can't seem to get it to accept my DX7 settings for DR/Expo, and have to try to set it up model by model in the sim.  USing FRAPS to capture then video, this couple of minutes is 5GB!!!

I would never have the balls to fly like this with my gassers, but I flew the Ultimate like this all the time.