The flying monkeys got me...

Helis, Fixed Wing, RC Sailing

AMA 957918

Pirate Kid Skeleton by RadDezigns.

Saturday, June 7, 2014

I got gas...

Well, its happened. And its about time it did! Why didn't I do this sooner?

I bought a 30cc gasoline powered Goldwing Sbach from Kenny Chandler last week on a deal we made. I made some mods, adding a Quikfire filter/primer, changes to the throttle linkage, tightened the rudder wires, fixed the receiver charge plug alignment, and set the plane up on my DX8. I had never setup dual elevator servos, but it was a cinch.  The cowl is good, but thin, and may need replacing soon. The most, and still problematic issue, is the gas can: the top is designed to be punched out so there is a pre-cut line all the way around the cap. This already tried to separate. I used JB Weld as it is gas resistant, and it provided a great seal. But yesterday I noticed it was already coming loose intact on the top...

Setting up the DX8 required I setup and tune the engine trying to find my idle and servo limits. For my first time I did alright. I still get a little four-cycle action at full throttle but just at first (I believe this means she is still a little rich at full throttle).  Flying electric I am used to a lot finer resolution: this throttle has idle, medium fast and full throttle, more or less.  Its a DLE 30cc with a Pitts muffler (bought a silencer for her not knowing someone had upgraded her to a Pitts...), turning a 19x8 Xoar laminated prop. She gives me a reliable 6700 rpm with an idle around 1670. This produces nice full power thrust and at idle no thrust. The manual says a generic (i.e. no prop noted) max of 8500 rpm, and some with less prop are getting pretty close to that, and idle at 1700. Kenny says the 6700 rpm is plenty, so we'll see. I think she will still need some fine tuning. My fear is the engine quitting at idle... this is my only beef with gas, and I think its only a problem during setup, is losing the engine in flight for an immediate dead stick landing.

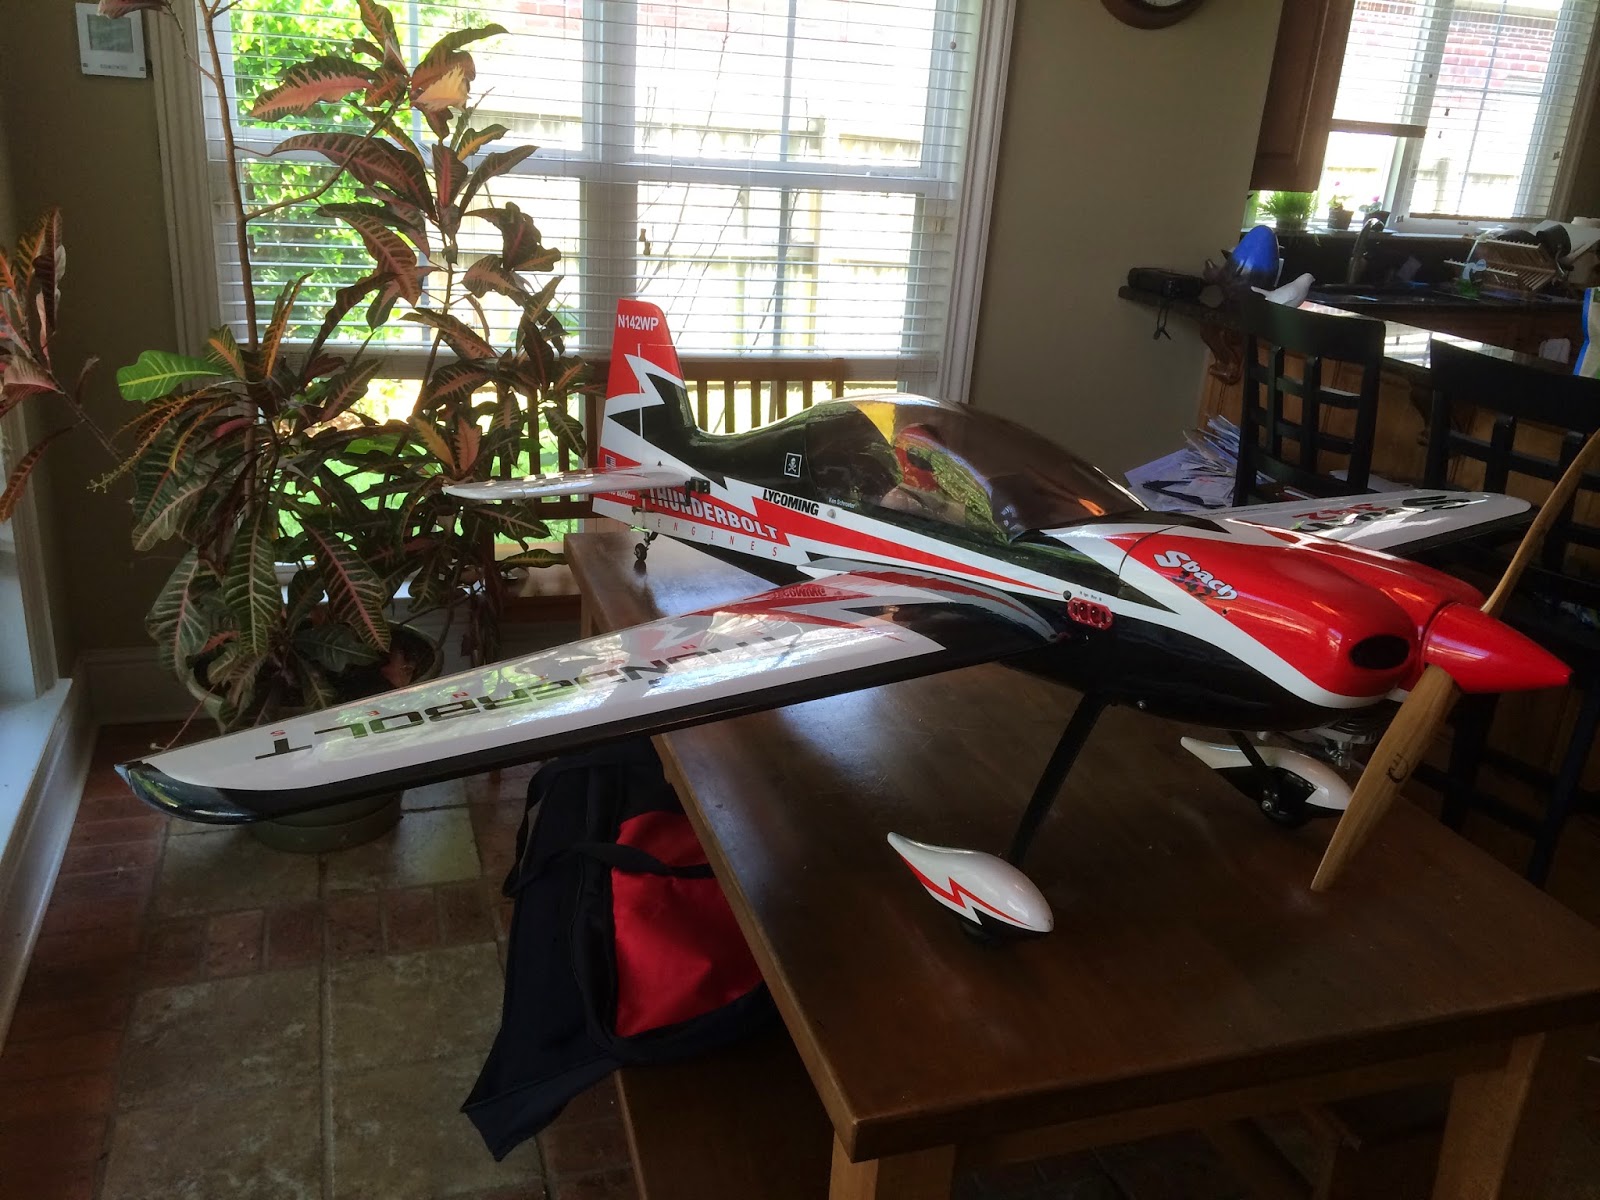
Here are her specs from my log:

Goldwing Sbach 30cc Gas

  • Battery: Rcvr 6V NiMh 2700,  Ign 4.8V NiMh 2000
  • Engine: DLE 30 with Pitts, NGK CM6 at 0.02 gap
  • Prop: 19x8 Xoar or Bambula
  • Optical Ignition Lock
  • Servos: 
    • Throttle: Hitec 5985
    • Elevator (x2): Hitec 5645MG
    • Rudder: Hitec 7955TG
    • Aileron (x2): Hitec 5645MG
  • Receiver: Spektrum AR7210 with Satellite
  • Comments: My first gas plane!  72” wingspan.  Miracle Ign/Rcvr Switch, Quickfire

Ginormous...


The JL Products Quikfire installed (the blue aluminum thingy). This acts as a filling/fuel delivery hub, gas filter and primer. It holds about 1/4 oz of gas once primed so that after the first start of the day all of the following starts should be quick.


It requires one port to the fuel tank and the vent/siphon preventer, and that's it. Had to MacGyver a cap for the extra tube. Otherwise nothing different. I did modify the firewall routing of the Tygon tubing, but that was it.


No sharp angles.


Top line going into the QUikfire is from the fueling button, the bottom one to/from the tank. 

Those weights are gone. Kenny noted the plane was already nose heavy and in my prelim CG tests that was the case. I took off about 3 oz of added weights, the Quikfire adding back a smidge. She seems well balanced now, certainly not tail heavy.

The plan is to take her out to the field today. Its not really a maiden as she has been flown before, but it will be my first gas flight. I am so used to the reliability of electric, and I have see so many people farting around trying to get their engines to run (and my tuning was not without its moments), that I don't yet trust. I hope to get her running as smooth I have seen others achieve.

Not to be forgotten, I will also be taking the 70 sized electric Sbach #2 out for her maiden today! More to follow.

Monday, June 2, 2014

MX2 Wing Repairs Completed

Finishing out the MX2 I got form Kenny that I will be converting to electric.

Last night I put the cross bars in to provide more flex support beyond the wing tube, and this morning I finished with top with some spackle then coted everything. It came out much better than I had hoped, perfectly true!


On the left a single 4x4mm balsa post between ribs, and to the right the popsicle stick X up against the main rib where the wing tube ends.


Another view.


A little spackle on top of the sheeted wood after repairing the cracked sheet balsa and putting a rectangle of tongue depressor under the sheet (used a push rod attached to a small post I CA'd to the rectangle to get it into place, with 5 Min Epoxy).  Tailored a piece of white cote. Can you tell where the repair is? Remember this wing had been repaired before (as I worked with the cote I can see patches).


I think this was ingenious of me, but I doubt I am the first to do it. I needed to segue a small piece of black cote at the corner. In the photo below you can't see it, but I wanted to continue the curve of the trim cote as I carried the black panel out to the end of the wing. I used a pencil to trace out the existing shape and used it as a template.


The finished wing on the bottom! I didn't continue the checkerboard as I don't have any of that green. You can't tell but the outer edge has the green of the original checkerboard and the white trim curving down, the black intercepts it. I an considering continuing the white trim down the inner side of the wing just for giggles.

Poifect!

Sunday, June 1, 2014

Repairing "Kenny's" MX2

Its mine now...

So Kenny had this Goldwing MX2 that is advertised as capable of being powered by the DLE 30cc gas engine. It can be, but it tore up the wing, around the wing tube, likely due to the flight forces the powerful gas motor put on it. He trashed the internals of the right wing. Since he could replace it, and was moving on from the plane anyway, he said it was mine if I wanted to fix the wing.

I couldn't get great pictures of the damage, but the ribs were broken and cracked for the length of the wing tube. The distal wing was fine. I opened up the bottom and took to it. I shored up the most broken parts knowing they took the most wing load. I wasn't going for pretty. Someone, unbeknownst to Kenny, had made similar repairs to cracks with glue, but no wood. I wanted this thing robust, with a nod to adding too much weight.


Looks pretty...


Big surface cracks with failed and blown out ribs underneath.


Small failures...


Major failures with blow out.


Hard to see but every rib cracked and some with blowouts.


One example of a blown out rib, cleaned up.


Laid popsicle wood down with one splice. It was the same width as the original wood.
Lots of CA. Blue tape keeps CA off cote.


Another set of repairs. Every black dot is where I stuck the pencil used to place the piece of wood inside the balls sheeted parts of the wing. Two major ribs here near the wing root were blown out. You can't see where I buttressed the ribs along the chord of the wing inside. Also, the thick (0.8mm) plywood that makes up that last rib with the screw it it at the wing root was also delaminating (you can see the crack at the "top" of the rib in the pic (its actually the bottom of the wing at about 11 o'clock. At 1 o'clock you can see where the sheeting popped out from behind the rib. Fixed that too.


A shot of that major rib repair. I ran that popsicle stick rib as above then overlaid a 4mm square rod of balsa along both sides of the original rib, running under the edge of the popsicle stick (which runs along the actual top of the wing). This is where the major loading occurred. That round hole is the end of the wing tube, so this is where its cantilever forces end and the wing can flex. Will run one piece of wood in an X between these two ribs to support against that flex.

I added some epoxy to the major joints, but the joints and supports I added are CA's into place. Will see if I can get some of this green cote at the LHS tomorrow. Final pics to follow. 

I just bought Kenny's 30cc Sbach from him, so it will be awhile before I get the electronics for the MX2 to rebuild it as an electric, but she will be awesome. I am pretty sure she will be Aidan's second plane!


Monday, May 26, 2014

A nice simple day

Memorial Day 2014

Met up with Kenny at MCRCC, and the crowd thickened as the day went on. Jason was there helping tune up engines, and got both of Kenny's running. Finally his 1/4 scale Cub running well, he enjoyed flying it in the moderate winds. It ran smooth as silk. Still working on his Sbach engine when I left.


Kenny's Cub


Dickie Ober brought a couple of tri-copters. He said they flew like hybrid airplane-helicopters, and then he proved it! This one was a hoot as he flipped it, rolled and looped it! He made it look easy. Then, despite the winds he took up an Align 130 micro  CCPM helicopter and put it through a 3D routine. Man got skilz!

I flew Aidan's Alpha 450 checking out the new nose "oleo" linked gear I had put on it, then flew the Pulse. Lots of wind made for some fun. I had also brought the Sbach to maiden, but being that I am not 100% getting over a cold, and the unpredictable gusts, I opted to keep it in the car. I also managed to hover the EXI 450 Sport. It still has a particularly violent shake at a certain RPM during spin up, and somehow the main shaft is slightly off center, somehow bent.  I think I will just leave it be and use the parts in the new frame I have coming.

All in all, a nice, simple day.

Saturday, May 24, 2014

Skyline/Goldwing Sbach 70 60" #2 Flight Ready

This morning I finished the setup on the second Skyline/Goldwing Sbach 70 60". You may recall the first one committed seppuku on only its 4th or 5th flight. I didn't blog this build as it went very much like the first one with a couple minor changes. One is that I made the rudder wires tighter.  I also used Du-Bro nylon hinge-and-pin hinges on the control surfaces with epoxy (the wide ones) instead of the flat fiber ones with CA.

She has the same power system and electronics. I have a 17x8 prop on her (turns out I had a 17x7 on before). I have ordered a 3 blade 16x8 EMP prop and a Du-Bro plastic 3 blade spinner. These don't come in 2-1/4', so had to get a 2". On a quick power test this morning I got a peak of around 1540 watts. Curious how the 3 blade will perform.

Common to both is that the wrong decals are included in the kit. Instead of the stickers for the red-white-black one, they come with the set common to the other colors. The white letters obviously don't show up on the white wings. General Hobby says they are sending the right ones, but last time even giving me a tracking number didn't get them in the mail so I am not holding my breath. The only one missing, really, is the large Sbach 342 that should be on the top left wing.

All in all, she setup. CG'd and looks identical to the first one. Looking forward to the maiden flight!


Tuesday, May 20, 2014

Don't Give Up!

I had tossed the EXI 450 Sport into the parts bin en mass after getting fed up with trying to solve the vibration problem. Last time I took it to the field it freaked itself out just sitting on the ground as it vibrated itself into havoc. I had cleaned up all the vibrations, but once the tail blades went on it vibrated finely and ended up creating gyro oscillations which lead to odd rudder inputs from the gyro.  I just could not solve the problem. So I hated on the heli and put it in the bin.

I also can't stand an unsolved problem, so today, after a couple of days of walking past the bin with agita every time I saw the heli,  I pulled it out and worked on isolating the gyro. Nothing really worked well. And then I remembered seeing a drawing on an Align gyro manual that showed various possible positions for the gyro, and I remember one in front of the main shaft rather than the traditional aft of the main shaft. This would move the gyro away from the finely vibrating boom and tail. I also changed the tail blades (weight balanced against one another) and new main blades, I changed the main and feathering shafts, and improved smoothness of movement in the tail assembly. This this is as clean vibration wise as I can possibly make it.

So, in main blades off spin ups the rudder servo was still and not being affected by vibration! I had to modify the canopy to allow the gyro forward. Tomorrow I will try hovering and possibly flying it!


If this doesn't work its back in the parts bin!

UPDATE: POS... into the parts bin. Still shaking itself apart. No idea why, done trying to find out. I have 3 other 450's to spend my time on.

UPDATE-UPDATE: So... I got to thinking, maybe its the Align 780 gyro? I threw an Assan GA250 gyro I had in the box on her and spun her up. She still has a very high freq vibration, but the gyro held and she didn't wag, nor did she shake herself apart! I plan to see what happens at the field on Memorial Day. I did order a $30 Hobby King 450 Pro V2 chassis to replace her though.

Thursday, May 15, 2014

The Cat-Proof Castle, Sbach Mod


I am building the second Sbach 70, and to keep the cats off of it (they like chewing them...), I built a castle around it. It worked!


One of the things I learned with the first one was that the metal used for the elevators (one has servo control, transfers the movement to the other with a U-wire). I took the wire and soldered a heavier steel rod to it as an anti-torque bar. Works great!