Took the brood out to BMF today, on one of the most beautiful flying days this year. The Stearman, Cornell, Trojan and the Suicidal Franken Cubby. The first three flew awesomely, but I set the Cubby aside before I realized a power issue with a battery and not the aircraft, so I didn't fly her today. I will tomorrow. Flying was disrupted by mowing... we bitch when its long, and we bitch when they cut it while we are flying, but at least Greg took breaks to let us fly!
Tomorrow's weather should be as good and with short grass!

Thursday, September 8, 2011
Aw, snap...
Tuesday was a tricky breeze day, calm one minute, blustery the next, as it sometimes is at BMF. This Tuesday was a bit more malicious being post Tropical Storm Lee. I took the Stearman up, toodled around, and the battery waned faster than usual, 8 minutes faster, probably because of the winds. I had trouble with the low voltage change in the ESC keeping enough thrust to maintain forward flight in the wind as I turned quickly to land. She drifted over the runway as I tried to trade altitude for velocity, but a gust would lift her five feet. There was only about 10 feet of runway left when I brought her down a bit briskly. She snapped the damn wing tabs (Eflite should double those...), broke the multiply repaired wing spar (out of stock until January 2012. Its a carbon fiber rod, WTF out of stock?), and bent the landing gear. No problem. Had the tabs repaired before I left the field, but the spar was going to take some work. Being a moron, I leaned over and twisted the landing gear back into place, succeeding only in completely fracturing the landing gear plate deep inside the aircraft fuse. That's why only moron's do that... Cursing myself, I took her home and benched her. It took a couple of hours, but it doesn't look bad at all. Taking her up today, a so far beautiful one!


Okay, I faked this photo, because I had already power drilled out the broken dowel, but you get the point. Since the replacement spar tubes are out of stock, have been for months, will be until Jan 2012, I have strengthened the tube and repaired it by fitting a conveniently perfect sized dowel down the middle. These are the outside ends, but the broken part looks the same. Power drill out the ends of the broken section and use the hand drill there to clean up the detritus.

So it looks clean, about 20mm deep on each end.

I measure out a 40 mm section, which I intentionally cut a mm or two short.

I put a dot of CA in one end, shove and tap the dowel into place, and do the same to the other end. Tap them snug together and CA the joint. Once it dries I sand it all smooth so it will fit. It breaks along the same lines every time it breaks. This preserves the wing structure by absorbing the forces.

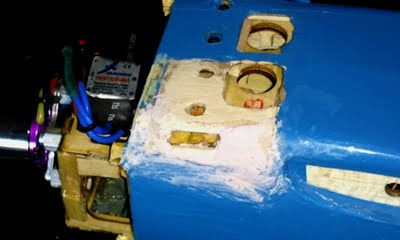
This is what the landing gear well looks like. It looks like rotted wood, but its just busted. I have peeled back some of the cote. I was doing this bit by pit, opening those holes, pushing wood, trying to avoid opening the fuse.

It became clear I was going to have to repair this by opening up the space.

That half of the plate was just hanging there loose, and here its removed. I cleaned up the edges.

Using 1 hr epoxy I set the plate back into place. The white stuff is lithium grease to keep the clamp from sticking to the epoxy. I left this overnight.

The next morning I dry fit the gear and rebent it to the correct angle with pliers, refitting and rebending.

I put some support pieces in the well, and placed a piece of plywood over it, cutting out the weight reducing space and the screw holes. Its supported on all 4 sides. I sanded it down. I also had put piece wood along the outer edge of the fuse to close the space and sanded this down as well using a Dremel then by hand.

I used some spackle to fill in the rough spots where a mix of crushed balsa and CA couldn't fill.

Let that dry a few hours then sanded it down. Cleaned it with alcohol.

I then recoted the entire section and poked out the screw holes. Never can get those to be pretty...

Came out pretty well! The wing was reinstalled and she's ready to go!
All looks, no action...
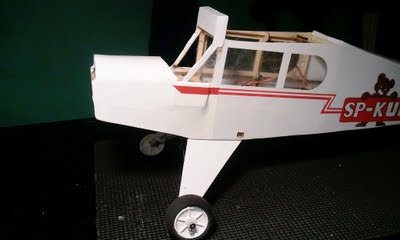
Sweet looking Green Model RC/Powerline Hobbies Super Cub after the repairs to the crushed front end, taken this past Tuesday. I added a new cowl, a modified Parkzone Mini Cub cowl split on the bottom. I fired her up, rolled her out and she promptly nosed up and rolled hard right into the ground. Just like before. I had put in some right vector, maybe I need a little more down, but she has a lot of down... a lot. The second try bent the gear and I had enough so I put her away. I will straighten out the gear when I feel like wasting flying time. I put another washer in pushing the vector a little more right. I will fix the gear later and try again. I love/hate Cubbies... Here's a pic before the flight.


Monday, September 5, 2011
Super Cub Uncrunch Pt 1a
While waiting for batteries to charge in anticipation of flying tomorrow, I decided to go ahead and do the white cote job. I also finished off the red side stripes. Not bad...


Not bad at all. Did the epoxy on the cracked cowl, and will repaint it tomorrow.
Super Cub Un-crunched Pt 1
This afternoon I began rebuilding the crunched Super Cub. I had no idea what I was going to do. I started by cutting the two sections free and seeing what fit and what didn't. I realized early on that the shelf in the middle was not going to fit back in properly. I also realized that the rather fragile fuse connections that fractured were mostly not going to bring the fuse back together. The only good connections were the two on the bottom... I really did a number on this one in this last crash! So... here's what happened:


The start. Held on by a small piece of cote...

Divided the sections and removed the electronics. It was a fairly clean break, but a lot of the pieces were shattered into chips.

I decided to start by reinforcing the existing firewall. It was crushed in one spot but unbroken. I used a lot of popsicle sticks on this rebuild.

I decided that a popsicle stick down the side with one cross member would reconstruct the battery box/nose section frame nicely.

The shelf wasn't going back in, but I could build one out of popsicle sticks, but they had to go in with a bit of a V shape.

I wonder how this is going to work at the main body end? I fit the sections together and the shelf sticks were a bit long, but would work marvelously!

Now I had to turn my attention to the body. I trimmed back the sheared off sections to give me a more square boundary.

I created a strong joint surface with popsicle sticks.

The check fit the sections together. Spot on! I was using the bottom connections to indicate to me the length the nose section would require.

I CA''d a couple of match stick spars, and CA'd the sections together. I filled in gaps with scrap chips and CA'd them into one piece, more or less.

Same with the other side.

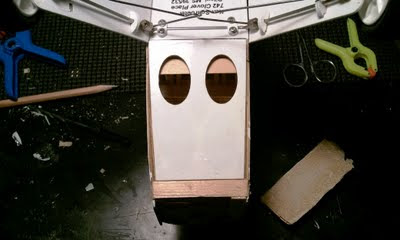
I slipped a piece of sheet balsa trimmed to fit wall to wall along the length and breadth of the nose section.
I used the shelf as a width wise securing joint with CA.

I hand drilled a lot of holes in the sheet balsa. I used a piece of tongue depressor across the section. You can see how I cut the popsicle stick V shelf a bit short. I couldn't measure it and came up a bit short. Using the balsa sheet shelf as a joint surface overcame that mistake.

I put the battery cover on, perfect fit! I got the section's length perfect. Under the air holes of the cover you can see a piece of popsicle stick running width wise. I needed to strengthen the underside of the nose section with this cross member as the bottom sections had sheared at this joint.

I added a small rectangle of sheet balsa to either side over the piecemeal upper joints to consolidate the connection and strengthen as well as smooth it out.

Here's the other side.
I will let it sit tonight, inspect it in the morning and cote it all white tomorrow. Not sure how I will redo the red stripes. They were printed on the original cote. I will likely continue it forward with some kind of single strip of red.
The cowl took a beating, lots of cracks, no complete breaks. I have CA's the cracks, and will likely epoxy them tonite. Plan to repaint it tomorrow. I think it's going to look pretty good. Will need to recheck the CG after reinstalling the electronics. I had an AR 6100 on this bird, but will be replacing it with an HK Orange receiver and satellite receiver. I think the Master Airscrew props will be arriving in the mail tomorrow, and she'll be ready to fly again. Hopefully the two of us will figure out our relationship and the flying will go well, perhaps Wednesday? Yay!
Wednesday, August 31, 2011
Super Cub Crunch
It was a good day at BMF! The winds were persnickety, calm one moment, blustery the next, from the east one moment, the south the next.
I flew the Stearman and and Cornell, and even got the new Super Cub to fly. The rightish thrust vector solved the loop and roll problem, but she proved a twitchy flyer. As I flew her I found she still had a left roll tendency and had to trim in full right to compensate. Once I did that she flew well. I took her up again later and she threw herself nose in from 3 ft. Changed the prop and fixed the gear, she was otherwise fine. Took her up again later and she was super twitchy. Dropped to lower rates and she was hard to control. Took her back to full rates and toodled around a bit more, and she was still twitchy in the wind, but flew fine. I tried lower rates again and she became uncontrollable in the wind. I switched back to high rate but it was too late and she slammed nose in... She's repairable, but its going to take awhile.

I enjoyed the company of Ray, Jerry, Ron, Joe and the newly wed Kenny, with whom I had a cigar to celebrate! The weather is going to deteriorate over the next few days, so I don't expect much flying. I will likely work on the Super Cub again!
Monday, August 29, 2011
Pirate Squadron on a Piratey day!

Getting more comfortable with the Cornell and the Stearman. Flew them both several times today and landed sweet every time. I realized I have been flying 3S 3300 mAh batteries in the Cornell, when the stock setup calls for around 2200 mAh. I have had no problem with the 3300s, but flying 2200s would free up the 3 (soon to be 5) 3300s for the Stearman, and I have 5 of the 2200s (one is actually a 2650) batteries for the Cornell. So I flew the Cornell exclusively on the 2200's today with no issues! Great! Time tested today; on landing after 10 minutes of flight, she ran another 7 minutes on the ground at a bit more than half throttle, where I fly her, on the 2200s. So I bumped her timer to 15 minutes. Later flights that worked just fine, coming in with plenty of bingo amps. I remain amazed at how beautifully the Eflte PT-19 flies, from graceful liftoff, through flight, to landing on rails... why did they ever discontinue her?
Almost lost the Cornell today. Doing touch and goes, when taking off a strong crosswind gust lifted her right wing. I compensated, but she started a hard left turn and was flying right at me. Stayed cool, she passed to my right by a good margin and struggled in what was now a strong tailwind. Structures coming up, stayed with her, got her up past them, waffling, and powered through over the trees. Regained full control (was just trying to keep up at this point) and she flew the rest of the pack fine! Damn near pissed myself... but proud my skills stayed with me and I remembered to fly the plane through this pucker.
Everything flew well today, though I lost my mind flying the Trojan and busted the wing. I was screwing around right over the runway when she was flying weird to begin with. Controllable, but I had full left trim in because of that already thrice repaired wing. When I got in this evening I put the new one on. In that crash I cremated the last of the 3 blade stock props, so I have to wait for the Master Airscrew ones I ordered last week to come in,.
Flew the Piratey flag over the field today to give the curmudgeons something to complain about. It actually looks pretty rad!
UPDATE 8/29/11 @ 2200hrs: Hoping its not a stock mistake! I found a new Elite PT-19 Cornell at SRI Hobbies in Louisville at the $70 closeout price. They charged me $31 oversize fee an $11 for Priority shipping, but hey, if I have it coming for real its a bargain!!!
UPDATE UPDATE 9/1/11@1612hrs: Crap... of course it was an inventory error...no joy.

Subscribe to:
Posts
(
Atom
)