I want to fly sooooo bad! Have to hit the gym this morning with the wife, then I am free. Hope the wind stays settled down. After yesterday the Cub is grounded, though I will call the LHS to see if they have an 8x6 slow flyer prop and maybe getting to fly her later today. I also plan to take the EXI back out today... Hope I can get somewhere with her and get a decent pack of hover out of her. I am also going to try the 250.
The ERazor took quite a hit. I rebuilt her last night and she's almost flight ready. Needs a vertical tail fin to protect her tail rotor, ordered it last night. She needed a new main shaft as it was slightly bent (could only tell when I took it apart and rolled it), the sheared feathering shaft had to be replaced. One of the main thrust bearings is suspect but looks good and functions fine. Replaced the totally wiped out flybar, but the cage looks fine. the pitch servo and the elevator servo stripped and had to be replaced. Lastly new FG blades, and check the CCPM.
So, today is a new day. Hopefully new success!

Monday, February 14, 2011
Sunday, February 13, 2011
Today's Carnage
It was just too nice a day, brisk gusts be damned. I found a new flying field. Just off Popp's Ferry behind the Pentacostal Church there is a big field, lined in the back by a small trailer park. Huge, with a small road no one drives on running through it. Perfect. And the road was heading right into the wind.
I took the Cubby up nervously. It flew great, but the upwind wing would lift with the cross wind legs, and it would scream down wind. I actually nearly hovered it into the wind, pulling back the throttle! On one of my landings, my last actually... it landed, then tipped forward with the prop hitting the ground, breaking the prop and flipping the plane. Broke the forward part of the wing. this thing reacts quickly. It was well balanced today.


I took the Cubby up nervously. It flew great, but the upwind wing would lift with the cross wind legs, and it would scream down wind. I actually nearly hovered it into the wind, pulling back the throttle! On one of my landings, my last actually... it landed, then tipped forward with the prop hitting the ground, breaking the prop and flipping the plane. Broke the forward part of the wing. this thing reacts quickly. It was well balanced today.

This is a preflight pic of the CG centering check.
I made these stands, works great.
I made these stands, works great.

I decided, what the hell, I'm going to fly the ERazor. It hovered nicely for several seconds, but I just couldn't control it. I have a feeling I need a lot less expo than I have (I dialed it down to 25% and it was still too much). It was always a little behind my commands and then would suddenly over react. The Futaba GY 401 gyro held like a rock! Now that's a good gyro. But, alas, it too went to ground and blades went flying. Broke the tail fin, ripped the feathering shaft apart, bent up the flybar. Not sure what else just yet. It was cool, just like on the Phoenix sim, blades flying through the air! Needless to say, the 250 stayed in the car. it wanted no part of this.


I am really enjoying the plane. It flies. I must be patient with the helis. I am getting longer and more stable time, albeit small, each time.
Saturday, February 12, 2011
It Stopped Being Fun About An Hour Ago...
In my previous post I tell about how great today was! But now it seems my EXI 450 and I have a tradtion too, just like the CB180D! I fly it, it bites the dirt with its blades, and I replace the main gear, the main shaft, and the feathering shaft. But tonight, there's more fun!
I knew I needed to replace the main gear, so I did, and in doing so, I had to pull the main shaft which I found difficult to do because it was bent... So I replaced it, and the generic replacement part is just a few molecules too big, so I have to break out the Dremel and grind it down a bit, but its easy and I get it to fit. Now, where the's a bent main shaft one checks the feathering shaft, and lo and behold, it too was bent, though quite subtly. And in replacing it and pulling the main shaft I had to move the servos a bit, and... wait for it... wait for it... yup, one of the servos was stripped! One of my nice strong metal gear digital EXI D213F servos. And this being a Trex 450 Pro clone, the pitch and aileron servos are impossible to get to without pulling the battery tray, which has 4 screws on both sides. So I remove the battery tray, remove the servo. I plug the new servo in the receiver to check 90 by moving the servo to both ends of motion and centering it, and then put the servo arm on it. Its pretty much spot on. I install the servo, rescrew the 8 screws with a touch of CA. I reconnect the swash links and then to check CCPM I fire up the transmitter, set throttle hold, and it binds. What's this? The servo I just replaced is up at a 30 degree angle tilting the swash. How can that be, its centered... but no, somehow its not. And because the servo arms on the Pro are buried in the frame, I get to take it all apart again. So I do. But I am pissed, and without thinking I accidently change the model in my Dx6i when scrolling the menus. You guessed it! It unbound, and the motor, which I didn't unplug (I ALWAYS do but didn't) fires up and before I can unplug the battery my nice carbon fiber tail blades destroy themselves on the glass lamp, which fortunately doesn't break. Geez... So, back to removing the battery tray and the servo... 7 screws come out just fine, but one just won't budge... and it strips, but not before rounding off my Mugen steel hex driver, which I then grind down as well to fix. Yay! I have to break out the extractors. Which don't work, so I drill out the bad screw, replace it, and put its 7 good brothers back in. I reconnect everything, and make a minor adjustment to the elevator link to level the swash. All that's left is to put the blades back on and recheck the CCPM.
And tomorrow I will do it all over again! But I hope to solve the tail wag problem... Yay...
A Great Day of Firsts!
This morning we woke to a beautifully calm day, and just had to go fly! Luke had been asking to go, so after breakfast we packed up the CB100#2, the CB180D, the EXI 450 and my Cubby. We headed out to the soccer fields near our house.
 First we got Lukey flying the CB100. It has some control issues (gyro, tail rotor aren't always on speaking terms), but he had a blast and did very well!
We also talked about developing good safety practices and start up habits which he practiced.
He's now psyched to develop in this hobby and was asking all kinds of tech questions.
 When I took the Cubby up both of us were pretty nervous, but now he also wants to fly planks!
I think he's hooked!
 So a good first day for the Luke!
Now its time to sim up and practice flying the CB100's indoors, next the CB180D and then the big CCPM birds and some plank time!
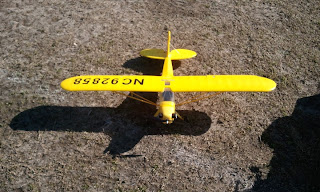 Today was also the first day for the J3 Cub to fly. I was a bit anxious as its so pretty, and I just wasn't sure about the durability of the Styrofoam like EPO material. Here's a preflight pic. When I was setting the plane up I realized I hadn't checked the CG yet... a quick check and it looked pretty good with the battery (it would turn out to be a pinch heavy in the tail)*. Spun it up and let her run. She kept pulling off to the right on the ground, which wasn't very even to begin with. I'll need to check the alignment of the rudder and the tail wheel again. This was persistent and made taking off very challenging. I think a better flying field would help too. It was pretty muddy and bumpy. The big tires seemed not to have too much trouble though. I might have been able to trim her up, but I just didn't get to it.

 Well she went up, and I realized she was a touch tail heavy, but not too bad. She responded very briskly to the controls. I calmed down a little, but was still a little heavy handed. She flew fantastic! She just wanted to climb. It was exhilarating! I was so afraid she would just leave the area and that I would lose her, but I did a pretty good job keeping her upright an in control, keeping her within the confines of the field. She was forgiving with hard roll and elevator inputs which made her a dream for a beginner. I landed her a bit hard the first time, bending the gear and breaking the plastic fairing*, but the fuse itself was very durable; she stayed upright in the landing. I flew her only a bit more as I didn't want to push my luck or fly too much with a less than optimal CG. I can't wait to fly her again, and hope I can get the ground turning issue sorted out.
You can see from the pics she blew up a lot of the wet sand, grass and mud, and you can also see the broken fairing (the back left is cracked and actually separated). I had to bend the gear back towards center as they spread a bit from the hard first landing.
I also took the EXI 450 up for the first time since its maiden which bent the rotor system up. She still had quite a tail wag, so I turned the gyro down some more. I am not convinced that's the issue though... I hovered her not so stably, but much better than before. But again, on the ground, she rolled once and the blades bit the dirt. Quick on the throttle hold saved the rotor, but the main gear is stripped and a few teeth are missing, so that ended her day. All that power still freaks me out. Forgot to take pics I also forgot to take some of the CB180D).
We ended the day with the CB180D. She still has issues moving forward when outdoors, but I had really good control of her otherwise. Flew a pack, take off, landings, figure 8's, Fast Forward Flight (when she wanted to), and as is our tradition, my CB180D and me, we hovered to our final landing, then a foot off the ground decided to roll suddenly and break a blade. I have never flown her without breaking a blade... I can fly her for several packs, and when I decide I am done, she will break a blade. Every frickin' time. I am just not happy with these Walkeras. Not one of mine flies right consistently. The slightest bump and the swashes get all squirrelly. No more Walkera's for me.
All in all a great morning! Luke is excited and hooked, and we flew fair today. I will set up the CG on the Cub (and tack down those snaps that won't snap), I already patched up the fairing, and replaced the CB180D's blade. I will clean up and inspect the EXI 450, and then work out the gyro bugs in the CB100. Loving the good RC life!
* Turns out, when I checked the CG at home its actually a bit nose heavy. Added a little weight to the tail, now its perfectly balanced. Also, the next morniing I realized I had to squeeze the gear back towards the centerline, which I shouldn't have been able to do because the criss-cross shock absorber thingy between them would have prevented me from doing so... but it wasn't there, so it must have fallen off in the little adventure...

We also talked about developing good safety practices and start up habits which he practiced.
He's now psyched to develop in this hobby and was asking all kinds of tech questions.

I think he's hooked!

Now its time to sim up and practice flying the CB100's indoors, next the CB180D and then the big CCPM birds and some plank time!


 Well she went up, and I realized she was a touch tail heavy, but not too bad. She responded very briskly to the controls. I calmed down a little, but was still a little heavy handed. She flew fantastic! She just wanted to climb. It was exhilarating! I was so afraid she would just leave the area and that I would lose her, but I did a pretty good job keeping her upright an in control, keeping her within the confines of the field. She was forgiving with hard roll and elevator inputs which made her a dream for a beginner. I landed her a bit hard the first time, bending the gear and breaking the plastic fairing*, but the fuse itself was very durable; she stayed upright in the landing. I flew her only a bit more as I didn't want to push my luck or fly too much with a less than optimal CG. I can't wait to fly her again, and hope I can get the ground turning issue sorted out.
You can see from the pics she blew up a lot of the wet sand, grass and mud, and you can also see the broken fairing (the back left is cracked and actually separated). I had to bend the gear back towards center as they spread a bit from the hard first landing.
I also took the EXI 450 up for the first time since its maiden which bent the rotor system up. She still had quite a tail wag, so I turned the gyro down some more. I am not convinced that's the issue though... I hovered her not so stably, but much better than before. But again, on the ground, she rolled once and the blades bit the dirt. Quick on the throttle hold saved the rotor, but the main gear is stripped and a few teeth are missing, so that ended her day. All that power still freaks me out. Forgot to take pics I also forgot to take some of the CB180D).
We ended the day with the CB180D. She still has issues moving forward when outdoors, but I had really good control of her otherwise. Flew a pack, take off, landings, figure 8's, Fast Forward Flight (when she wanted to), and as is our tradition, my CB180D and me, we hovered to our final landing, then a foot off the ground decided to roll suddenly and break a blade. I have never flown her without breaking a blade... I can fly her for several packs, and when I decide I am done, she will break a blade. Every frickin' time. I am just not happy with these Walkeras. Not one of mine flies right consistently. The slightest bump and the swashes get all squirrelly. No more Walkera's for me.
All in all a great morning! Luke is excited and hooked, and we flew fair today. I will set up the CG on the Cub (and tack down those snaps that won't snap), I already patched up the fairing, and replaced the CB180D's blade. I will clean up and inspect the EXI 450, and then work out the gyro bugs in the CB100. Loving the good RC life!
* Turns out, when I checked the CG at home its actually a bit nose heavy. Added a little weight to the tail, now its perfectly balanced. Also, the next morniing I realized I had to squeeze the gear back towards the centerline, which I shouldn't have been able to do because the criss-cross shock absorber thingy between them would have prevented me from doing so... but it wasn't there, so it must have fallen off in the little adventure...
Friday, February 11, 2011
I Ordered an E-Flite Stearman PT-17!

A beautiful aircraft. I am putting the recommended servos in (JR MC35 and MC48), and a Spektrum AR6100 Receiver (so it will work with my Dx6i transmitter). I will be using a Hobbywing Pentium 40A ESC with 3A/5V switching BEC, and the Optima 75M42 950kv motor from Exceed.
My hangar is now complete! Well, until I decide I am ready for that FBL 600...
More to follow!
PS: BTW, the PT17 Stearman on the Phoenix simulator was added yesterday by Phoenix! But it flies like a short wing jet... it needs a lot of airspeed to fly, and stalls like a rock. I will have to be careful.
Thursday, February 10, 2011
Muahahaha! Frankeheli... oh... still needs blades.
Frankenheli 450ST (Stretched) is built but still awaiting the 360mm main rotor blades. The ESC arrived the other day, I installed it yesterday and programmed it today. I also decided to replace the plastic gear Tower Pro SG90s with EXI D213F digital metal gear servos, and completed that last night. The boom, belt and rudder rod arrived this afternoon, and I installed them today. Just need the blades, and I will recheck the CCPM setup. On my heli these are the only things changed. Motor , ESC, etc are all stock 450 size.
Stock 450 Boom 345mm x 12mm
Stretch 450 Boom 368 mm x 12 mm
Stock 450 Rudder Rod 295mm
Stretch 450 Rudder Rod 330 mm
Stock 450 Bladees 325mm
Strecth 450 Blades 360 mm

Wednesday, February 9, 2011
Moved My Workbench!

It was getting crowded. If a heli or airplane didn't fit on my bench it was difficult to work on. I didn't even consider trying to work on my airplane in that space! There was no room for growth either. Where am I going to put my Eflite Stearman PT-17?
So yesterday I decided to move it to the other side of the room... Off to Lowe's!

It took a lot of time to patch the wall where my hangar used to be, then move those hangars (and one additional one) under the newly installed shelf. I had to fill ginormous holes where the screw holders were, refinish the wall then prime it, and roller paint it...

Its great as this is all in the Man Cave with the 50" plasma I have connected to cable, and the computer I run Phoenix on, that is, when I can get the kids off the XBox 360 and Dead Space 2...

And I left room for my Stearman!

Love it!
PS (2/10/11): I solved the lighting problem by bolting a power strip to the side of the table and running a grounded extension under a cover to the outlet. A clamp on task lamp (Architect's, $20 at Office Depot) 75W equivalent CFL bulb lights things up nicely!


Close up of the Hangar
Close up of how I hang the helis on the "Hangar". I use some purple nylon cord from Home Depot and these wall hooks from Lowes. I tie a loop in the cord and run it under the front of the landing skid, and criss-cross them. Looks good, very stable, no stress on the heli. The hooks are just are enough apart to fit the transmitter handle, and are rubber coated.


Subscribe to:
Posts
(
Atom
)