In my previous post I tell about how great today was! But now it seems my EXI 450 and I have a tradtion too, just like the CB180D! I fly it, it bites the dirt with its blades, and I replace the main gear, the main shaft, and the feathering shaft. But tonight, there's more fun!
I knew I needed to replace the main gear, so I did, and in doing so, I had to pull the main shaft which I found difficult to do because it was bent... So I replaced it, and the generic replacement part is just a few molecules too big, so I have to break out the Dremel and grind it down a bit, but its easy and I get it to fit. Now, where the's a bent main shaft one checks the feathering shaft, and lo and behold, it too was bent, though quite subtly. And in replacing it and pulling the main shaft I had to move the servos a bit, and... wait for it... wait for it... yup, one of the servos was stripped! One of my nice strong metal gear digital EXI D213F servos. And this being a Trex 450 Pro clone, the pitch and aileron servos are impossible to get to without pulling the battery tray, which has 4 screws on both sides. So I remove the battery tray, remove the servo. I plug the new servo in the receiver to check 90 by moving the servo to both ends of motion and centering it, and then put the servo arm on it. Its pretty much spot on. I install the servo, rescrew the 8 screws with a touch of CA. I reconnect the swash links and then to check CCPM I fire up the transmitter, set throttle hold, and it binds. What's this? The servo I just replaced is up at a 30 degree angle tilting the swash. How can that be, its centered... but no, somehow its not. And because the servo arms on the Pro are buried in the frame, I get to take it all apart again. So I do. But I am pissed, and without thinking I accidently change the model in my Dx6i when scrolling the menus. You guessed it! It unbound, and the motor, which I didn't unplug (I ALWAYS do but didn't) fires up and before I can unplug the battery my nice carbon fiber tail blades destroy themselves on the glass lamp, which fortunately doesn't break. Geez... So, back to removing the battery tray and the servo... 7 screws come out just fine, but one just won't budge... and it strips, but not before rounding off my Mugen steel hex driver, which I then grind down as well to fix. Yay! I have to break out the extractors. Which don't work, so I drill out the bad screw, replace it, and put its 7 good brothers back in. I reconnect everything, and make a minor adjustment to the elevator link to level the swash. All that's left is to put the blades back on and recheck the CCPM.
And tomorrow I will do it all over again! But I hope to solve the tail wag problem... Yay...

Saturday, February 12, 2011
A Great Day of Firsts!
This morning we woke to a beautifully calm day, and just had to go fly! Luke had been asking to go, so after breakfast we packed up the CB100#2, the CB180D, the EXI 450 and my Cubby. We headed out to the soccer fields near our house.
 First we got Lukey flying the CB100. It has some control issues (gyro, tail rotor aren't always on speaking terms), but he had a blast and did very well!
We also talked about developing good safety practices and start up habits which he practiced.
He's now psyched to develop in this hobby and was asking all kinds of tech questions.
 When I took the Cubby up both of us were pretty nervous, but now he also wants to fly planks!
I think he's hooked!
 So a good first day for the Luke!
Now its time to sim up and practice flying the CB100's indoors, next the CB180D and then the big CCPM birds and some plank time!
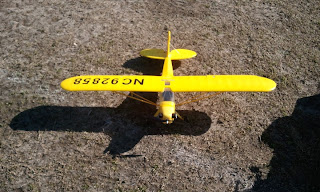 Today was also the first day for the J3 Cub to fly. I was a bit anxious as its so pretty, and I just wasn't sure about the durability of the Styrofoam like EPO material. Here's a preflight pic. When I was setting the plane up I realized I hadn't checked the CG yet... a quick check and it looked pretty good with the battery (it would turn out to be a pinch heavy in the tail)*. Spun it up and let her run. She kept pulling off to the right on the ground, which wasn't very even to begin with. I'll need to check the alignment of the rudder and the tail wheel again. This was persistent and made taking off very challenging. I think a better flying field would help too. It was pretty muddy and bumpy. The big tires seemed not to have too much trouble though. I might have been able to trim her up, but I just didn't get to it.

 Well she went up, and I realized she was a touch tail heavy, but not too bad. She responded very briskly to the controls. I calmed down a little, but was still a little heavy handed. She flew fantastic! She just wanted to climb. It was exhilarating! I was so afraid she would just leave the area and that I would lose her, but I did a pretty good job keeping her upright an in control, keeping her within the confines of the field. She was forgiving with hard roll and elevator inputs which made her a dream for a beginner. I landed her a bit hard the first time, bending the gear and breaking the plastic fairing*, but the fuse itself was very durable; she stayed upright in the landing. I flew her only a bit more as I didn't want to push my luck or fly too much with a less than optimal CG. I can't wait to fly her again, and hope I can get the ground turning issue sorted out.
You can see from the pics she blew up a lot of the wet sand, grass and mud, and you can also see the broken fairing (the back left is cracked and actually separated). I had to bend the gear back towards center as they spread a bit from the hard first landing.
I also took the EXI 450 up for the first time since its maiden which bent the rotor system up. She still had quite a tail wag, so I turned the gyro down some more. I am not convinced that's the issue though... I hovered her not so stably, but much better than before. But again, on the ground, she rolled once and the blades bit the dirt. Quick on the throttle hold saved the rotor, but the main gear is stripped and a few teeth are missing, so that ended her day. All that power still freaks me out. Forgot to take pics I also forgot to take some of the CB180D).
We ended the day with the CB180D. She still has issues moving forward when outdoors, but I had really good control of her otherwise. Flew a pack, take off, landings, figure 8's, Fast Forward Flight (when she wanted to), and as is our tradition, my CB180D and me, we hovered to our final landing, then a foot off the ground decided to roll suddenly and break a blade. I have never flown her without breaking a blade... I can fly her for several packs, and when I decide I am done, she will break a blade. Every frickin' time. I am just not happy with these Walkeras. Not one of mine flies right consistently. The slightest bump and the swashes get all squirrelly. No more Walkera's for me.
All in all a great morning! Luke is excited and hooked, and we flew fair today. I will set up the CG on the Cub (and tack down those snaps that won't snap), I already patched up the fairing, and replaced the CB180D's blade. I will clean up and inspect the EXI 450, and then work out the gyro bugs in the CB100. Loving the good RC life!
* Turns out, when I checked the CG at home its actually a bit nose heavy. Added a little weight to the tail, now its perfectly balanced. Also, the next morniing I realized I had to squeeze the gear back towards the centerline, which I shouldn't have been able to do because the criss-cross shock absorber thingy between them would have prevented me from doing so... but it wasn't there, so it must have fallen off in the little adventure...

We also talked about developing good safety practices and start up habits which he practiced.
He's now psyched to develop in this hobby and was asking all kinds of tech questions.

I think he's hooked!

Now its time to sim up and practice flying the CB100's indoors, next the CB180D and then the big CCPM birds and some plank time!


 Well she went up, and I realized she was a touch tail heavy, but not too bad. She responded very briskly to the controls. I calmed down a little, but was still a little heavy handed. She flew fantastic! She just wanted to climb. It was exhilarating! I was so afraid she would just leave the area and that I would lose her, but I did a pretty good job keeping her upright an in control, keeping her within the confines of the field. She was forgiving with hard roll and elevator inputs which made her a dream for a beginner. I landed her a bit hard the first time, bending the gear and breaking the plastic fairing*, but the fuse itself was very durable; she stayed upright in the landing. I flew her only a bit more as I didn't want to push my luck or fly too much with a less than optimal CG. I can't wait to fly her again, and hope I can get the ground turning issue sorted out.
You can see from the pics she blew up a lot of the wet sand, grass and mud, and you can also see the broken fairing (the back left is cracked and actually separated). I had to bend the gear back towards center as they spread a bit from the hard first landing.
I also took the EXI 450 up for the first time since its maiden which bent the rotor system up. She still had quite a tail wag, so I turned the gyro down some more. I am not convinced that's the issue though... I hovered her not so stably, but much better than before. But again, on the ground, she rolled once and the blades bit the dirt. Quick on the throttle hold saved the rotor, but the main gear is stripped and a few teeth are missing, so that ended her day. All that power still freaks me out. Forgot to take pics I also forgot to take some of the CB180D).
We ended the day with the CB180D. She still has issues moving forward when outdoors, but I had really good control of her otherwise. Flew a pack, take off, landings, figure 8's, Fast Forward Flight (when she wanted to), and as is our tradition, my CB180D and me, we hovered to our final landing, then a foot off the ground decided to roll suddenly and break a blade. I have never flown her without breaking a blade... I can fly her for several packs, and when I decide I am done, she will break a blade. Every frickin' time. I am just not happy with these Walkeras. Not one of mine flies right consistently. The slightest bump and the swashes get all squirrelly. No more Walkera's for me.
All in all a great morning! Luke is excited and hooked, and we flew fair today. I will set up the CG on the Cub (and tack down those snaps that won't snap), I already patched up the fairing, and replaced the CB180D's blade. I will clean up and inspect the EXI 450, and then work out the gyro bugs in the CB100. Loving the good RC life!
* Turns out, when I checked the CG at home its actually a bit nose heavy. Added a little weight to the tail, now its perfectly balanced. Also, the next morniing I realized I had to squeeze the gear back towards the centerline, which I shouldn't have been able to do because the criss-cross shock absorber thingy between them would have prevented me from doing so... but it wasn't there, so it must have fallen off in the little adventure...
Friday, February 11, 2011
I Ordered an E-Flite Stearman PT-17!

A beautiful aircraft. I am putting the recommended servos in (JR MC35 and MC48), and a Spektrum AR6100 Receiver (so it will work with my Dx6i transmitter). I will be using a Hobbywing Pentium 40A ESC with 3A/5V switching BEC, and the Optima 75M42 950kv motor from Exceed.
My hangar is now complete! Well, until I decide I am ready for that FBL 600...
More to follow!
PS: BTW, the PT17 Stearman on the Phoenix simulator was added yesterday by Phoenix! But it flies like a short wing jet... it needs a lot of airspeed to fly, and stalls like a rock. I will have to be careful.
Thursday, February 10, 2011
Muahahaha! Frankeheli... oh... still needs blades.
Frankenheli 450ST (Stretched) is built but still awaiting the 360mm main rotor blades. The ESC arrived the other day, I installed it yesterday and programmed it today. I also decided to replace the plastic gear Tower Pro SG90s with EXI D213F digital metal gear servos, and completed that last night. The boom, belt and rudder rod arrived this afternoon, and I installed them today. Just need the blades, and I will recheck the CCPM setup. On my heli these are the only things changed. Motor , ESC, etc are all stock 450 size.
Stock 450 Boom 345mm x 12mm
Stretch 450 Boom 368 mm x 12 mm
Stock 450 Rudder Rod 295mm
Stretch 450 Rudder Rod 330 mm
Stock 450 Bladees 325mm
Strecth 450 Blades 360 mm

Wednesday, February 9, 2011
Moved My Workbench!

It was getting crowded. If a heli or airplane didn't fit on my bench it was difficult to work on. I didn't even consider trying to work on my airplane in that space! There was no room for growth either. Where am I going to put my Eflite Stearman PT-17?
So yesterday I decided to move it to the other side of the room... Off to Lowe's!

It took a lot of time to patch the wall where my hangar used to be, then move those hangars (and one additional one) under the newly installed shelf. I had to fill ginormous holes where the screw holders were, refinish the wall then prime it, and roller paint it...

Its great as this is all in the Man Cave with the 50" plasma I have connected to cable, and the computer I run Phoenix on, that is, when I can get the kids off the XBox 360 and Dead Space 2...

And I left room for my Stearman!

Love it!
PS (2/10/11): I solved the lighting problem by bolting a power strip to the side of the table and running a grounded extension under a cover to the outlet. A clamp on task lamp (Architect's, $20 at Office Depot) 75W equivalent CFL bulb lights things up nicely!


Close up of the Hangar
Close up of how I hang the helis on the "Hangar". I use some purple nylon cord from Home Depot and these wall hooks from Lowes. I tie a loop in the cord and run it under the front of the landing skid, and criss-cross them. Looks good, very stable, no stress on the heli. The hooks are just are enough apart to fit the transmitter handle, and are rubber coated.


Sunday, February 6, 2011
Frankenheli v2.0!
I have new plans for Frankenheli! I am going to stretch him to go from 325mm rotor blades to 360mm blades, which will also require a longer tail boom. More to follow! Parts are on the way, though I continue to have a lot of trouble locating tail rod guides for a 450 class heli... Found a great deal on carbon fiber blades on Dinodirect.com which made this affordable!
Saturday, February 5, 2011
Exceed 40" J3 Cub Build
There were some production issues with the kit I will discuss below, and the instructions were pretty worthless ("Connect wings. Connect tail..."). There was nothing on which screw went where, or how to setup the servos (setting up 90, setting the control rods and their connections to center the control surfaces, how to bind (or that you might even need to), how to use the Y connector for the aileron servos. But I managed with my rocket scientist IQ and my incredibly talent for building (as well as my stunning good looks). Its together, nothing broke, and the spare parts really have no place to go!
I inspected all the parts, and studied the tiny photos in the instructions to get some idea where this was going to go. I don't know if the factory bound the receiver and transmitter, so I did it with the included bind plug. Then I checked the movement and 90 on the rudder and elevator servos. I marked in the fuselage which was which (their rods apparently cross in the fuselage). Then I set to work on the build. I chose to work the tail first, then install the wing, though the instructions say to put the wing on first.

Box detail

Ginormous! Will have to build this downstairs on the big table.

Un-topped, see what's inside. Nicely packaged.
 .
. The parts pieces un-boxed. Not much to it.

Some genius at Exceed put a fighter jet glass cockpit in this Cub!

The bits.
No explanation for which thingy is going to go where. The Allen wrench isn't going to be used as an Allen wrench, but as a lever to secure the prop.

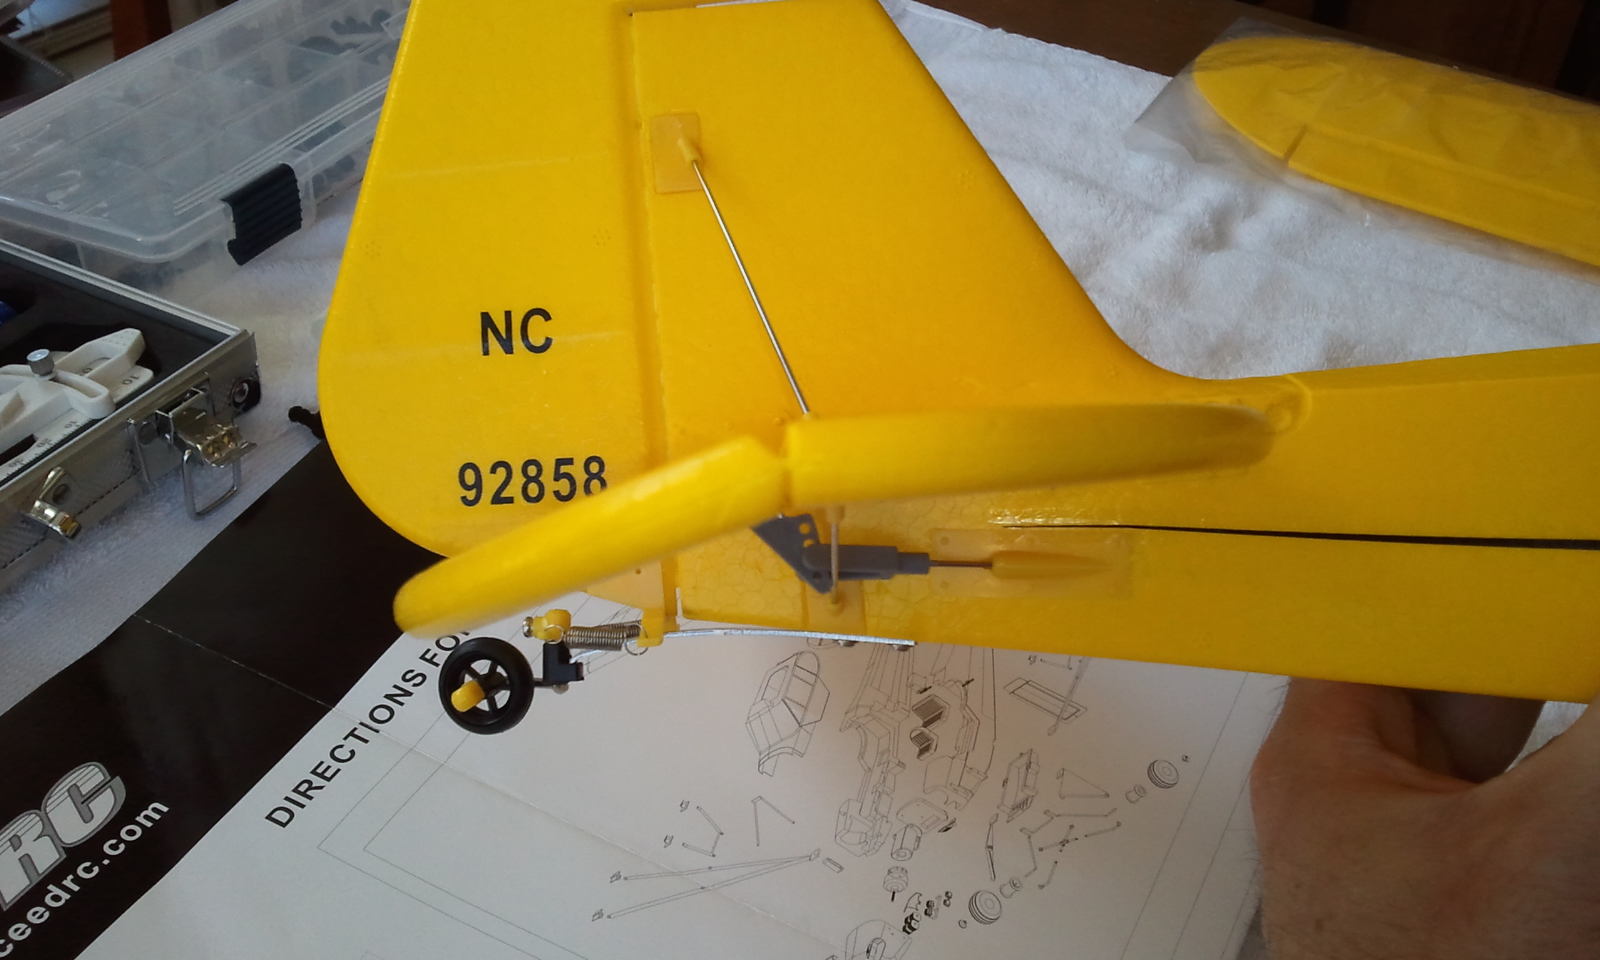
There is shrinkwrap over the short springs in the gear struts. Notice one is longer than the other. Underneath both springs are intact, quite short. Must have been being pulled on when it was shrink wrapped to give it room to expand. At least they could have done it evenly... You can see below the spring on the left that the strut itself is bent oddly... It's not stressed, it just was formed that way. Not very good QC on the gear assembly. Pushing the gear struts into place was very hard, especially since I didn't want to crush the fuselage, which is made of a strong specialized Styrofoam like material called EPO.

Close up of the uneven spring shrinkwrap and the oddly shaped gear strut on the left.

Another production issue. None of the control hinges would snap closed on the tail and stay closed. I will use a little heat to melt the plastic holding it closed before flight. I also had to use a longer screw from my heli kits, the big one on the lower right. This usually could be secured with 2 diagonally opposed screws (not that the instructions tell you that...), but there is a piece of the control surface hard plastic that sticks under the grey tower like thingy, tilting it and making it fairly unsecured. So I used 3 screws. But the problem area that lifted was that lower one so I had to put the big screw in. I used all long screws on the tail assembly with their thick wings.

Setting up the control surfaces on the tail. The servos were decently 90'd, but I had to loosen the control rods in the fuselage and set center on the elevator and rudder, then re-secure them. Pretty easy. I didn't spin the hinge on the end of the rod other than to center it cleanly. I had plenty of control rod to play with. I liked the way the connection to the servo is set up (see below) that allowed this easy setup. Check out the detailed tail wheel. Very springy for greaser landings!

Full up elevator. I have no idea if that is enough, and there is nothing about setting it up in the instructions. But as you can see it centers nicely, and equally deflects up and down. No binding in the servos to speak of, and no binding in any of the linkages. Easy peasy!
Full down elevator.

Close up, rudder linkage. No snap for you!

Now the wing. I did this after the tail, though the instructions said to put the wings on first. It would have been a pain moving the fuselage around working on the tail with the wings attached, so I put it off until I was ready. The servo wires are long (I think longer than stock servo wires... have think of that if I have to order new ones). They pass down a snug trench in the foam to the center. They are then passed down into the fuselage to the servo compartment. Its easy to see this when you put the model together. Checked the servos, wondering why only one worked at a time... Realized, "Hey... this is a four channel heli, I mean, airplane. Channel 5 doesn't do squat. I wonder if the Y harness is for the aileron servos?" Because, once again, nothing in the instructions. Turns out I was right. The servos get the same signal to deflect in the same directn, but are installed mirror image of each other so that the ailerons always move opposite each other. It doesn't matter which is right or left when plugging them in. Mine were correct (right roll input, right aileron up, left down, etc). If they were backwards I could probably reverse the aileron dip switch on the transmitter.

The servo and receiver compartment is open. You can see where I labeled R for rudder servo, E for elevator. The servos and their linkages, the control rods, and the Y harness can all be seen. The battery compartment is just to the right, with the vented cover. Wires are out of the battery compartment just so I could connect and disconnect power more easily during the build; they tuck cleanly inside the fuse. The black box at the top is the receiver. I wasn't sure if the antenna was supposed to be inside or outside the fuselage (fuse), which was long so made me think I did it right. I ran it out the back of the servo compartment and taped it to the fuse.

There was plenty of room for the receiver in the receiver box. I placed a trimmed piece of styrofoam from the shipping box to help hold the receiver and its wires in place so they didn't interfere with the servos. A single plastic wire tie secures the servo wires together as they come out of the servo compartment. the gray wire with the white end piece is the antenna.

Plugged in the aileron servos using the Y harness, once I realized something was amiss without it (only one servo moved until I used the harness. Doesn't matter which plugs into which, just make sure polarity is correct). Checked 90 on the servos, they were fine. Aileron linkage in the pic. I chose one small screw for the thinner trailing edge and one long screw for the ailerons thicker leading edge. The aileron hinge pieces snapped closed fine. Spun the hinges to fine tune center for the control surface at center stick.
Screwed the wing on, figured out how to take the spinner off, a little Locktite, prop in what seemed the proper direction, and voila, a Cub is born! Spin up showed I got it all right, lots of power! All the surfaces work well.
A few completed stock pics!


I love the detail on this plane, better than any of the others I saw out there.

Hung in the wall above my bench.Want to enjoy having her before I fly her and break her...


Yes, that's a HeliFreak sticker on my Plank!
Can't wait to fly!!!! Sim, Sim , Sim, then fly next week!
Subscribe to:
Posts
(
Atom
)