Sunday, August 14, 2016

Bad Solar D654 Servo from Hobbypartz.com

I have bough a couple dozen of these Solar servos, liking these and the Exi ones. For low cost servos they are of great quality and I have never had problems with them. I just bought 5 for the Slipstream Edge 540, wanting an extra one in case one came in bad or went bad.

One came in bad.


Hobbypartz (which is one of several companies owned by the same group) has a link to customer service, which took me to a non-functioning Service Ticket Submission. I was signed in, and it kept saying that there were unfilled required blanks, when actually their weren't. I remembered that they used to use RCDiscuss, their forum, for customer service, and that you had to know that, and that the links were at the very bottom. I went there and signed in, made a post, and it wouldn't accept my short video, so I put a link to a shared file on my Box account (I later posted the video to my Youtube).

Its a $10 servo. I hope they don't tell me to ship it to them...

UPDATE(9/2/16): Awesome, they are sending a replacement!

GOD I LOVE THIS HOBBY!

Took the Trex 500 out today, sporting her new skids instead of the u stable but cool tripod rolling gear. Spun her up. Magnificent! Silent, no vibration, perfect blade tracking. I was stunned by the beauty. Perfect setup.

Then I hit Flight Mode and this. I must have accidently hit the self destruct switch.


Butchers bill at first glance: 4 main rotor blades, one tail blade, main shaft, autorotation gear, three servo control horns, tail boom.

HK Edge 540 480 12x6 Flight Testing

It's getting gusty as a storm is coming, but to a point I had confidence she could handle it. I was out at Joppa Hill.

I took her up with a 12x6 Xoar prop, very lightweight. She flew marvelously but the motor and packs got a little toasty. Too much prop pulling too many amps. The pic below shows the 12x6 and an APC 10x7. I have a 10x5 and 10x6 APC coming. One of these three will be the right prop. Last landing was almost backwards with a prolonged gust, so I called it a day.

I'll start with the 10x7.


Wednesday, August 10, 2016

Hobby King Edge 540T 480 Foamie Maiden

Whoo-hoo-yippee-kai-ay!  My new favorite flier!

Maidened the Edge between storms today in a light breeze. I am not sure she liked the Zoar 10x5, and on her first landing in thicker grass she broke it. I replace it with an APC 9x7.5 and she hauled booty. I am not sure what prop she will need if I am ever to learn harriers from one of you bright lights, but acrobatically I pulled all the stops and she kept up. She doesn't seem to stall, but instead rapidly loses altitude wings level. A little power and she immediately comes out. No aileron differential needed, tight rolls. Snaps and stops on a dime. On edge not so stable, but a lot of that is me not being very good at them, and I think needing more rudder throw. Her tiny wheels did okay, but the wheel pants didn't make it through the first take off. I still put slightly bigger wheels on when I got home. Put her through 5 packs.


Great stable flier. Never thought I'd get another foamie but these full fuse EPP Edge 540 planes from Hobby King are a blast!  I do love gas, but there is a lot to be said about tossing a plane in the car and up and flying within minutes of arriving.

Headsuprc 480 motor, 3S 2200 mAh, APC 9x7.5, 380 Watts, 32 Amps, 5 min flight.

UPDATE(8/13/16): After some advice from The Boys, I ordered a 10x5 and 10x6 APC prop from Tower Hobbies. We'll see how those fair.

Tuesday, August 9, 2016

Hobby King Edge 540T EPP Foami


Headsuprc Power 480 Speed with their 40A ESC, and a Zoar 10x5 wood prop. Produces 380 Watts. Maiden soon!

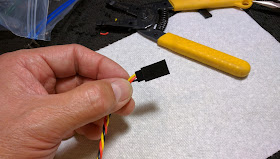
Making female extension plugs from male ends

In an odd transmorgrification of the use of gender to describe plugs for the obvious reasons, there is always one hermaphrodite to create confusion for concrete thinkers. That hermaphrodite in our RC world is the "female servo plug".

I bought a boat load of extensions from Hobby King, not knowing why anyone would want a male-male plug, I didn't look closely and while wanting female-male plugs, I bought all male-male plugs. Sending something back to Hobby King is a nuisance, not because they are difficult, you just never quite know whats going on, so I decided to see if there was a simple plug adapter I could buy a bunch of. There is, and there isn't.

To remedy this one has to buy adapter kits and remake the ends. There is no simple plug adapter piece.


When you buy this...


But wanted this... (BTW, I call the upper end the male and the lower end the female, while actually the lower one is more male inside and female on the outside, and technically the wires go INTO the upper one making it also female... hence some confusion. Upper one is male, lower one is female for this discussion, and is the generally accepted nomenclature).


You buy this. These make female ends of male ends. I don't like the Futaba ends because they have that damn edge, but I didn't see JR one's.


Theses are the parts. The original male-male (or female-female, depending on how you look at it) lead, the connector pins on their manufacturing rack (also three I pulled off), and the replacement connector and its sheath.


You remove one of the male ends, strip the wires a bit long, and spin them through your fingers to tighten them up.


You slip one of the connectors on. There is a hub the end of the wire goes under, and at the end are two separate sets of squishable grips. Using needle nose pliers carefully crush these down onto the wire to secure it.


They should look like this when you are done.


PAY CLOSE ATTENTION TO THE WIRE ORDER! It must match its opposite end. Close observation will also let one recognize that the pins go in wire side facing up and will softly click, locking into place in the evolving "female" connector.


AGAIN! BE CAREFUL OF THE WIRE ORDER! This should slip in easily, if not, something is not right.


When you are done with the inner plug of the evolving female end, it is decidedly male. If this was all there is and no sheath, this would indeed be correctly identified as the male end, because, well...


But the adapter does get a sheath and it simply snaps on, so it is now the end that gets inserted INTO, so is now the female end. I couldn't tell if it matters which end of the sheath goes on the plug and which remains the accepting opening.


With, you know, pins inside... You can also see, on the lower edge, that Futaba edge blocking the corner.


Thats it. They are a pain to have to do but easily done, and inexpensive. Just please remember that you must get the wire order correct, and that if the pins don't slide in easily, something is wrong.


Monday, August 8, 2016

Dem right thar's what you'd call big wheels...

In an effort to make her friendly to fly out of the thick clumps of shit-grass at Joppa Field, and in general, I put 4" Robart wheels on the Stik. Da-yum... 


Gives me now about 1.5" clearance with the 13x8x3 prop. Much better than the 3" ones gave me.


I like big wheels and I cannot lie.


In the scheme of things, not so big...

Friday, August 5, 2016

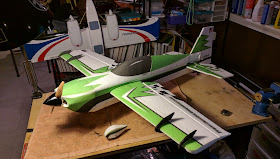
Hobby King Edge 540 Foamie Build

I started on my new EPP foamie, wierd stuff, but durable for sure. I amusing 3M 4693 Clear adheaive, foam safe and strong, and some CA, which EPP is fine with.

I found out thet the Eflite 10 sized motor I wanted to use, formerly in my Eflite Ultimate wpuld not fit... so I ordered a 300W 480 motor from Headsuprc for $20. That should be plenty of power on 3S.

I have the aircraft built, just need to install the gear and electronics including the servos, I had to trim off the back corners of the horizontal stab/elevator to get them to pass theoguh the fuse, but other than that the build went smoothly. This took no time at all. If I had the motor I could have her built in an afternoon.


Letting the rudder set. I think she is going to be a lot of fun!


Too rich... go figure.

The Boys from SNHFERCC answered my FB post about why my 10cc gasser is so covered with oil. In fact, both 10cc planes. I dont think its a problem with the 30cc. They suggested better oils and that I might be running too rich. I suspected this, but wasn't sure because it seemed to be where the needles neede to be. I know I am way too many turns past factory for them not to be.

Well, the engine on the Big Stik quit in the air the other day and I dead sticked her to a sweet three pointer. I could not get her to start, then she would start, but not run, and then not start. I have been suspicious of the CDI (ignition) since it went skinny dipping, so had bought a new RCGF one from Hobby King (best price). I checked the spark, there was one, but unreliable. The fuel delivery system was clean, and as much of a pain as it was, I even removed the tank and pulled the clunk to make sure. I replaced thw CDI, and not only does she start and run, she runs smoother. I took the needles back to factory and got her running perfectly after a few tries and found I had been running waaaaay too rich. I had been out abour 4 or more turns, and now was at about 2-3 (factory is 1-1/2 or so). She would run well at all ranges, but if I went from half throttle to idle she would occasionally stall. Now that problem is gone too with the spot on tuning. Idle reamis a bit high, but any lower and she will stall (it dips when brought briskly back to idle if she had been running at one setting for a few seconds. A little high idle lets her do this without stalling and doesnt produce much thrust if any).

After tuning I put my hand under the muffler at differnt throttle settings while running... no oil. Sweet.


Can't wait to get her back in the air!


Thursday, August 4, 2016

Trex 500 4 Blade Heli Flight Ready

The front tail power take-off gear came in today from Heli-Direct, and I installed it easily. Another fast shipper, helps they are down the road in Boston. I programmed the BeastX for the 4 Blade head, almost entirely spot on, small adjustment for pitch (set it for 11 degrees). I spun her up without the main blades and found a tremendous high frequency tail boom vibration at all speeds. I took the tail blades off, smooth as silk. I checked the blade weights and they were unbalanced by 0.3 gm. Fixed that so they match weight at 4 gm, reinstalled, and now at low speed they were smooth, but at high they vibrated again. This was affecting the gyro. I exchanged the fiberglass ones for plastic ones I have and they were balanced at 4 gm each. Spun her up, smooth as silk through the whole range, tossed the old ones. I had balanced the main blades against the heaviset one and each pair was pretty close, but each pair was quite different from each other. I used electric tape and they all match, but it took a lot of tape...


I am not sure I will keep the wheelie gear. I did lock them so they don't spring (that was very cool, but worsened ground stability).  Much better, but still a little tippy.  I am hoping she flies better than she did the other day...

Wednesday, August 3, 2016

Fly bar parts departed the aircraft...

The parts I ordered from Medusa Heli and AMainHobbies arrived as if they had been transported like on Star Trek. I ordered them, I turned around and there they were. I LOVE THAT! I think I need to put them on the preferred vendors list.

I installed the torque tube and the front gear power take-off, and the boom stays, then installed the entire assembly into the frame. Blades off I spun it up. Works fine, but there was some vibration, and I stared at the flybar. It was a bit off, tracking kinda weird. I noticed too that there was a slight wobble to the main shaft: it needed replacing. I uninstalled it, and as I pulled the top Jesus bolt, I noticed that a bearing and a collared screw were missing from the flybar cage. This isn't an easy fix... I need two specific parts: a cuffed bearing and a collared screw.


See that big gaping hole? The one on the other side was still there but is loose.


The two parts I need.

I looked online and I can't find the washer. The screw is found in a bag of Trex parts that costs $27, and I only need one screw from the entire pack... That's an expensive screw.  If I can't find this I am not sure what I am going to do...

Trex 500 4 Blade Head Installed

While I am awaiting the power take-off front gear set for the Trex 500 tail, I noticed that the main shaft was a degree out of vertical: bent. Since I needed to replace the main shaft, I decided now was as good a time as any to put the Align 4 blade head on, that I have been holding on to for the past 3 years.  BTW, it was a stripping/stripped front power take-off gear that was causing slow head speeds on the tail allowing it to wander, destabilizing the whole thing. I hope. I really don't want to cough up money for fast digital servos.


Blade grip bearing build.


Installed in the head, top off.


Swash washout on.


Top on. Sucker is held on by 12 screws.


Measuring the control rods to within 0.01 mm, and yet they will still be off.


Swash on, links on, phased by design.


All up.


And installed. When I get the power take-off gear in for the tail I will tune the head tracking mechanically and then reset the BeastX.  I have metal horns for the servos, but just never got around to installing them.


Tuesday, August 2, 2016

Stik Underside Wing Redux

I needed some more underwing white for contrast, so did up a bit this evening. Added the darts.


Stik with 13" 3 Blade Prop

Still with the 3" wheels, I put the Master Airscrew 13x8x3 on, and as you can see she has a bit more prop clearance. The MA 14" Scimitar was a tight fit for ground clearance. I still think she needs the 4" Robart wheels I ordered.


Mojo risin'!

Had a chance to take the Big Stik up for her maiden flight this afternoon, and it was splendid!


Preparing to takeoff!

After working a bit more to tune the RCGF 10cc engine, she took off easily and climbed out. She was quite a bit nose heavy still, so clicked up the elevator to mid rates. Once she was up I trimmed in up elevator and she settled down. I expected that with fuel she would be nose heavy. No trim required for roll or yaw. She had plenty of zip with the twin 14x8 Master Airscrew Scimitar. I flew her around for several 8's and circuits, then brought her in for her first landing. I focused hard and made a perfect 3 point landing. Despite this after rollimg out she slowed down then the prop touched a clump and the engine stopped but she rolled out on all three.  She is still breaking in, runs a bit rough, but ran true. One of the things I like about the open engine is being able to tune it so easily.


On her tail wheel there is about an inch of ground clearance for the prop. This is with the 14" prop and 3" wheels. I ordered 4" Robart wheels and will try the 13x8x3 three blade Master Airscrew prop if necessary.

This was so important. I felt like flying her was as simple and straight forward as I needed her to be. I had planned to spend a couple of hours, but I was at Joppa Field and some guys showed up to practice lacrosse. I won't fly with people on the field so I cleared out.

Earlier I had spun up the HK500 FBL heli with a BeastX 3 axis stabilizer. There is something not right about the setup. I may need to change to digital servos... she wasn't stable and needed a lot of rudder trim. I really never took her out of hover. She needs some tuning up and sorting out.

All in all, my mojo is surely rising!