Monday, December 19, 2016

Big Stick Forward Wing Hardpoint Failure

It was frosty, 26 degrees, zero to 8 mph winds, but sunny. The snow was frozen on top but I thought I would still get out with the 10cc Stick on skis. I installed the large Du-Bro skis up front and a single Du-Bro park flier ski in back. Easy install, work fine. And slippery...

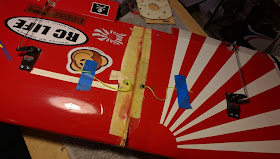
But the repaired forward wing hard point failed, fortunately on the ground. I need to come up with a way to firmly attach something to the wing to act as the cantilevered forward attachment to the fuse.


Hung the camera from my neck strap.

So disappointed that after getting my gear out to the field to not get to fly. At least this came off before lift off. That would have ended poorly. Trying to think of ways to fix this problem. I don't have much space under the wing, none in fact forward, as the fuel tank is right there. This limits bringing a long piece back aft for better leverage.

Friday, December 9, 2016

Slushy Fields


Too slushy... gone or frozen over would let me fly. The Du-Bro skis for the Stick and Cubby are on their way.


The slush really outlines the serious clumpiness at Joppa Hill Fields. Surely this affects the kids play as much as the landing gear on my planes?

Thursday, December 1, 2016

RCGF 10cc Cylinder Head Changed Out

I ordered a new cylinder head from RCGF-USA for the 10cc engine whose spark threads had stripped. It arrived today and I installed it, and started the engine.

It oddly did not come with a new gasket, which would have been nice, so I took care removing the old one. After removing the old cylinder head, I oiled down the new one with WD40, slid the piston in (the piston ring passed easily this time. Bolted it in place, reinstalled the muffler/header, took her out and started her up. After she burned off the WD40 she ran just fine. There is some 4-cycling, but she is a new cylinder head. I put a Master Airscrew Scimitar 14x8 on her for the break in, then I may or may not put the 4-blade prop on. Who am I kidding? Of course I will eventually put the 4-blade prop back on...


I also learned a couple of things I can do to save the other head. I can try re-threading the 1/4-32 plug (of course my 40 piece tap and die set doesn't have that one so I had to order one from China).  I can also drill and sleeve the threads with a kit. I want to see if I can make the repair to the threads so I have a new skill and a working extra 10cc cylinder head. 

Ran half a tank at various speeds, tuned her a touch. I am off Saturday, so if weather permits I will fly her and continue the break in.

Friday, November 25, 2016

A Bad Bulkhead and RCGF Spark Threads Strip Again

I ran the engine today with the 14x8x4 prop and it didn't come flying apart. It started and ran fine, but stalled in idle after a few moments. During that time the prop was fine, stable, and tracked perfectly without bowing, and no vibration. The second time it stalled at idle I could not restart it. I took it into the shop and I removed the spark plug to check the ignition and it sparked, but inconsistently. I decided to replace the Hall sensor and it fixed the spark problem. The Hall sensor frame had snapped and in repairing it it sat a bit higher than I think it should. I could not get the sensor head out of the case, so I had to replace the entire thing, and I just happen to have a couple.

I noticed that when I removed the spark from the RCGF 10cc engine, I noticed a "spring" in the hole. It took me a moment to realize that the spark hole threads had stripped. This has happened before as RCGF had a problem with the early engines they supposedly fixed where the threads were too soft or something and kept stripping easily. I replaced the spark and it threaded "finger tight". I tried turning it over and gas poured out... I could twist the plug with my fingers, it would "tighten" and then a half twist and it was loose again.

I ordered a new cylinder head. I hope these replacement heads have better threads.


When I noticed that the threads were stripped, I was concerned that some pieces fell into the cylinder head. I decided I needed to remove the entire cylinder head. Two of the screws came out easily, but two were blocked by the muffler header screws. One of them had stripped a while back... so I had to remove the entire engine to find a way to get the muffler off, and had to remove the prop. One thing leads to another...

I pulled one screw of the header easily, the other I could not get any purchase on. I twisted the muffler and it loosened. I managed to twist it and the screw got looser and looser, and eventually I could not turn it anymore. I grabbed it with a pair of needle nose pliers and managed to completely remove it! I got the cylinder head off and it was heavily carboned. The cylinder head was rough, like 60 grit. I used Gum-out and cleaned it all to nearly completely shiny. It took a few minutes to get the piston ring back into the cylinder head, but then it moved nicely. I used some WD40 to lubricate it. I put it all back together. That's when I tried to put the plug back in. 

Waiting for the new cylinder head. 


Earlier I kept hearing something rattling around and wondered if there was damage inside the frame where the fuse had been cracked. I opened the access panel I had made when I first built the plane, and found that the frame behind the firewall and in front of the gas tank was broken. I cut some ply into a U shape and divided it to get it in. Epoxied it. I added a couple of cross braces on the top, bottom and middle. This was easily done and came out perfect. This pic is before the crass braces. 

When the cylinder head is repaired, I hope to tune the engine for the new prop. Its very light. I have no idea if I will keep the 4 blade, it was more for fun than anything else. I wanted to check the static thrust, but the engine stopped working before I could.

So she sits on the bench. Hopefully the cylinder head will get here soon.

Thursday, November 24, 2016

Oh, please, you would if you could!

It called to me...


Yeah. 4 blade 14x8x4, baby. She was flying a 13x8x3.
You know you would too, if you could. You know it. Especially you, Gary Hoffman.

I am not sure how it will work, but I will run it tomorrow. Its a prop from an electric FMS P-51 Mustang. I had flown it on the doomed VQ Models P-51. Same spinner, new blades. It was on the shelf. I had to. I had no choice. I honestly don't even know if the blades had enough clearance, especially with the tall grass, but she also had a 14x8 twin blade on her (Master Airscrew Scimitar).


I completed the repair on the side wall. It was still a little weak after the epoxy, so I laid down a thin sheet of balsa. 

I also kept the stabilization system on. I figured out how to set up the remote cut, so the default is OFF. I will take her up and turn it on. I have a feeling it was just too sensitive and was over controlling itself.  I lowered the gains. We'll see, but its an unsolved problem and I need to solve it... Found a couple of tears in the cote on the vertical stab, fixed them too. She is flight ready. I'll try the prop at home, but if weather permits, I'll head out to Joppa in the morning.


So this happened...

First flight with my Big Stick being equipped with the Hobby King Orange 3-Axis Stabilization system.


What an incredibly well designed plane, sturdy as hell. The prop took a devastating hit, the nose buried about 6 inches into the dirt (thankfully it was soft), the wing attachment hard point came off as designed and will need to be repaired but there is no damage to the wing, and the port side of the fuse just aft of the engine cracked up. Its all but already repaired.  Luke on video.


Really, that's it. I thought she'd be toothpicks.


Broke clean off.


Spinner is about 4 inches down there, had to dig it out.


The only part of the fuse to take damage.


Close up.


Epoxy, a few pieces of balsa. I will sand it down and lay a thin sheet of fiberglass or thin balsa down.
I'll add photos as the work progresses, including repair of the wing hard point. 

I still have the stabilization system in the plane. There is supposed to be a way to rig a cut-off using the AUX channel, but I need to read the manual. If I can't rig one I will pull the system out and skip it. I checked the settings and they all move in the correct direction. Was there too much vibration? I always check the control surfaces before takeoff and they were also all appropriate. There was no wind. No idea WTF happened but it was all I could do to keep her out of the trees.

I will need to patch a hole in the underside of the wing... I dropped prop on it on the workbench. 

Wait until you see what I plan to put on for a prop!

Happy Turkey Day!


Monday, November 21, 2016

Futaba Micro Spline 21T....Maybe

I  wrote about the issues trying to find the spline to fit the Tactic Mircro TSX-10 Servos. I had purchased Dubro Futaba Micro Spline compatible servo arms and they were too small. At the same time I bought some aluminum arms for the same spline. Since the Dubros did not fit I didn't  expect the aluminum ones to, so when they didn't fit easily I was dismayed. I am still waiting to hear from Hobbico about what the proper spline is...

Today waiting for another project to dry, I retried the aluminum arms. With a bit more effort they actually fit quite snug. I removed them, and nothing had crushed to give the illusion of fit. I had already replaced the rudder and elevator with the original plastic arms since they were bolted on to extensions so the lack of width at the end didn't matter. I installed the aileron arms, and had to replace the carbon fiber rods with steel, but they work fine. Any more range of motion and they would come right off.


Aileron. From China on Ebay.


Elevator. Original plastic on epoxy extender.

She is ready to fly!

UPDATE (11/23/16): Hobbico had no idea what the spline is, but they got one and now know its 20T. They are checking to see what splines will be compatible. I am not aware of any 20T micro spline...

Friday, November 18, 2016

Big Stick Wing Repair


Several days ago the wing came off the Big Stick after the left tip touched on landing. It cracked the mid-seam and tore off the front attachment knob thingy. The simple job got complex when a lack of attention on my part lead to further damage to the top of the wing.


I epoxied the underside seam and used my drill as a weight to flex it down.


I pulled back the cote from the center and laid down 3 layers of fine mesh fiberglass cloth with alcohol thinned epoxy as the resin.


Not sure how secure the top was, I laid down 2 layers of fiberglass.


Sanded it flat.


Same on the underside.


While that set for 24 hrs, I examined the broken forward wing attachment. There should be a section of plywood that juts out; that goes into the fuse to secure the wing's front edge, the back end being held by wing screws.


Cut it clean as a right angle. You don't want this too strong or instead of giving way as it did here, the energy will break up the wing or fuse.


Epoxied in a new block.


Epoxied in some side supports. I sanded down the aft parts so they were flush with the attachment hard point.


In trying to sand down the very thick epoxy on top I didn't take into account the slight V in the center. The sander ground down a bit of balsa on wither side of center. I had to peel back the cote and fill it with wood filler. It provides some strength over Hobby-lite, of which mine had dried out.


The bottom finished. I painted the forward attachment with black gloss enamel. I used black cote aft as I didn't want to waste the red.


Ran a piece of black tape across the front and back as a soft shim for better fit.


The top is nice and smooth, re-coted, and applied a new sticker.

I had checked the fit of the forward attachment several times as I rebuilt it. I wholly expect that when I go to put it on, it will not fit and snap clean off... we'll see. Waiting for that black paint to dry.

Toying with putting a stabilizer on it.

Looking forward to flying her again soon!

Life on the other side IS better...

I haven't flown the 30cc MXS-R for some time, and there was no reason not to today. Wow, was it beautiful.

Its late fall, and the sun is making it ever harder to see aircraft silhouettes to the south end of the fields at Joppa Hill. I had often toyed with the idea of flying from the far (west) side of the field, putting the afternoon sun behind me and the a/c. I had flown a couple of circuits from the usual side and decided to pack up and mosey on across to the other side. It actually is very much worth the trip!


The set up on the west side, looking south, the sun is off pic to the right. You can see the famously clumpy grass that rips landing gear  from planes (and I expect, ankles form kids). Used the post to hold the plane back on a rope.


Looking back across the field to the east side.


You can see how deep in the grass the big 30cc gets, so you can imagine how high the grass is on the smaller planes. Little electrics have a bit of trouble here. Those are 4" tires! I can imagine how sweet a geo-tex runway would be here.


The tarmac.

Flew several tanks. She of course flew very, very well.  Upped the aileron differential to 40%. I had been planning on putting a stabilization system on her, but I would lose my flaperons and things like differential, so meh. Decided not to. She is a very stable flyer, though she does have some elevator differential I need to tune out.

I think I will make the trip across the field to fly every time I come out here. I liked having a better view of the plane, and the sight lines are better. I seemed to be able to see where she was in relation to the Ents at either end much better, and since she wasn't flying over the eastern forest, I didn't have them to worry about either. I do have to be careful not to overfly the road or the lot if there are people or vehicles there. I do still have to be aware of the goals... almost nailed one again today but for luck.

Wednesday, November 16, 2016

Ooooh... New Shiny!

The bullet spinner I bought for the Waco was ginormous... too big, but pretty. It is a 2: spinner across the broad base. I bought a Tru-Turn 1-1/4" (1-3/8" across the base) bullet spinner, and its perfect.


The larger 2" one and the Ttu-Turn 1-1/4" spinner.


Much nicer fit and look!


Tactic Servo Spline Mystery


Now its just annoying.

I built and flew the HK Sbach 1200 EPP with a hodgepodge of various micro servos from EXI and Solar, and they worked quite well together. My OCD wanted the servos to all be of the same make, so I bought a set of Tactic TSX-10 micro servos. High speed, metal gears. Nice servos.

The arms were just long enough, but they tapered at the end, so when I drilled holes big enough for the control arms there was so little plastic left I did not want to use them. I thought,"Meh... I can order some longer ones on line." So I went in search of the spline. Most of what I read was consistent. Tactic, seemingly a Futaba servo, used Futaba splines. Ok. So I ordered some Dubro Futaba Micro Control Arms, and they were too small. Maybe they meant the Standard 24T spline. Nope, don't fit, too big. Okay... Maybe they used the Mini Spline? Hmm... nope, they don't fit either.

Nobody lists the spline, not Tactic, Hobbico, Servo City, Servo Database... no one. I got the info from RC Groups and other forums, that they use the equivalent sized Futaba Spline, but that doesn't seem to be the case.

I have an email out to Hobbico. We'll see. So for now, I can't fly the Sbach.

Damn OCD.

Sunday, November 13, 2016

Wing came off clean at least...

I am resisting putting a 3-axis stabilization system on the Big Stick, in part because there is really not a place for it, its a very stable flier, and I like having some planes without it. But today made me rethink that.

Took her up for a flight, and on the first landing a brisk wind, about a foot off the ground, the left wing dipped suddenly, struck softly and came right off. Clean. Off. No damage to the fuse, which humorously continued along on its way for about 30 more feet. The wing did split along the center seam on the underside, pulled the fuselage wing attachment block off cleanly, and broke off the leading edge tip that secures it to the fuse, but there is no other damage to the wing or the servos. It yanked the servo wires out of the receiver, and tossed the receiver* from the fuselage breaking off the side of the receiver next to the plugs. The wires all survived, nothing parted or pulled out from the servos, all the servos work and the receiver works. Basically, wing only. It is easily fixed, but I want to also make the seam stronger.

*I noticed the receiver was missing when I got home and was looking to plug the wires back in and it wasn't there. I drove back to the field and found it half way between where the wing had landed and where the fuse ended up.


That's the wing block attachment dangling from the back of the wing. The aileron servo wire extensions were pulled right from the receiver.


You can see the plastic end of the receiver is gone. It works fine.


Drill and battery pack is my favorite workshop weight. I gapped the crack and packed it with epoxy.


After laying down the fiberglass. Underside where the crack between the halves is. I epoxied the halves back together by opening the gap on the bottom, let that dry an hour or two with the weight on it, then laid three layers of fiberglass and epoxy thinned with alcohol out 1 inch out either side from center.


A little over 1 inch wide on the topside. I can't say how far down toward the top of the wing the split between the wing halves might have gone, so I decided to lay 2 layers of fiberglass on the top too. I have a couple of days at work, so I can let it completely dry. I will sand them down smooth and re-cote or paint them on Wednesday.

And with that I reset the Crash Clock.

Saturday, November 12, 2016

Chasing Daylight


Went out to Joppa Hill this afternoon and took her up, only to have to land because a women's lacrosse team showed up for practice. Came back a couple of hours later and got in a flight before it got dark enough I couldn't see her orientation and landed.

Tomorrow.

Thursday, November 10, 2016

Waco Maintenance

The grass at the Joppa Hill Field has always been hard on my planes, in particular the landing gear. Today I had to repair the wheel pants, and re-install the rudder. The latter was a bit of a surprise as the bulk of the vertical stress from the tail gear is on the fuse, but the tail wheel gets banged back and forth by the clumps of grass. I think that yanks the tiller and stresses the rudder hinges.


As seen earlier, the wheel pants take a beating.


Repaired the rudder, removed the wheel pants.


Rebuilt both. The port one broke in half, and the other was splitting. just finished repainting them.

I frackin' hate the Rustoleum rattle can spray caps. it took a lot to get it to spray. i just bought a bunch of replacement caps on eBay hoping that helps.


I noticed a crack in the cowl. The muffler header is apparently right against it and its cracking.


This bears close watching. Not quite sure what to do about it. Notice the grass stains on the muffler... cutting grass just taxiing.

Today I also ordered a smaller bullet hub for the prop from True Turn. I think it will look much nicer. Can't wait to get it.


She sounds amazing, I wish I could capture video of her in flight. The sound is so scale its scary.  She has so much power I flynher mostly 1/4-1/2 throttle.